Showing posts with label Desserts. Show all posts

Wednesday, May 26, 2010

South of France Lemon Cheesecake

When The Boss Carlo left the library, she selected this cheesecake for her farewell party. Now the music cataloger is leaving, and she selected this one as well. And it will be payday. So, two birds, one stone.

This is the easiest cheesecake to make. I assert the superlative confidently. You shall see Dear Reader. You shall see. And then you will believe.

First of all, there is no crust. Simply line a 9-inch cheesecake pan with parchment paper as I have preached all along.

In a large bowl, stir a couple pounds of ricotta cheese with a rubber spatula until smooth. Add sugar and flour and mix until incorporated. Then six eggs are added, one at a time, mixing after each addition. Finally (yes, finally) lemon zest, lemon juice, vanilla and a little cinnamon are added.

Pour the batter into the pan and pop it into a 300° oven for 75-90 minutes. This cheesecake will be done when a knife can be inserted in the center and come out clean. (Other cheesecakes are done when lightly browned and or jiggly in the center).

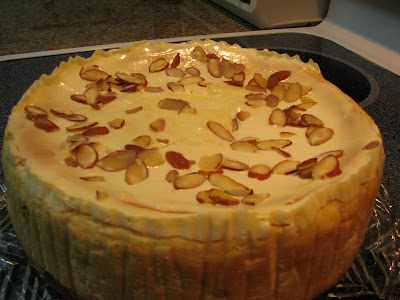
This is a refreshing diversion (if one were to be needed) from the usual cheesecake. The texture differs from the "normal" cheesecake. As you can see from the picture, a large crack developed on the top of the cake as it cooled. Fortunately, it won't affect the taste.

Bon appétit!

Monday, May 17, 2010

Black Forest Cheesecake

Cheesecakes do not get much easier than this one. For the Benton County Mental Health mid-month staff meeting, I prepared a Black Forest cheesecake.

I used chocolate double-stuffed Oreos for the crust. The cookie filling serves as the binding agent so the butter can be eliminated. This is not a health choice, but a choice that makes things simpler.

Cream cheese and sugar are beat on high for three minutes. Then two eggs are added, one at a time, and incorporated. The sides are scraped down and six ounces of semi-sweet chocolate, melted and cooled, and vanilla are added.

The mixture is poured onto the crust and the cake is baked at 350° for 45 minutes.

After allowing to cool for a couple hours, the cake is refrigerated overnight. For a topping, I used a can of cherry pie filling.

Bon appétit!

Tuesday, April 27, 2010

Mandarin Orange Cheesecake II

"Again?" You may ask. Yes. Again. The previous Mandarin Orange Cheesecake was for Benton County Mental Health. They were test subjects. Very willing test subjects.

For my payday cheesecake, I modified a few of the steps. Two.

First, instead of folding the mandarin slices into the cheesecake batter, I poured half the batter in the pan. (Remember to line the sides with parchment strips!) Then I set the orange slices on top, spacing them over the surface. Then I added the rest of the batter.

Instead of blanched slivered almonds, I used sliced almonds. I just wanted a better contrast on the surface.

Now, the trouble. When I poured the topping onto the center of the cheesecake prior to spreading it evenly across the top, it slumped into the cake. In my attempt to spread the topping, the aesthetic quality I was hoping for was lost. The taste would not be affected though, unless you were the person who got a slice with an intrusion of extra topping. Oh bother. You can't win them all. I doubt there will be complaints.

Bon appétit!

Tuesday, April 13, 2010

Mandarin Orange Cheesecake

This month's cheesecake for the good folks at Benton County Mental Health is a Mandarin Orange Cheesecake. I made one a few years ago and decided it was time to make another. To improve on the original.

Remember to line the pan with strips of parchment paper to facilitate removal of the finished cake.

Starting with the crust, I used vanilla wafer crumbs instead of graham crackers. Why not? Just to be different. A deviant. Melted butter is worked into the crumbs and then this is pressed into the bottom of a 9-inch cheesecake pan. Pop it into the freezer while the batter is made.

The batter consists of cream cheese, butter, and sugar, beaten at medium-high speed for a few minutes. Have I said lately how much I love my stand-up mixer? I really do! Eggs are added, one at a time. Then sour cream, vanilla and concentrated orange juice. After this has all been mixed well, a can of drained mandarin orange sections is folded in. The batter is poured over the frozen crust.

The cake bakes at 350° for 45-55 minutes. Just until it is starting to brown ever so slightly, and there is a little jiggle left in the center when the pan is gently shaken. Remove from the oven and leave the oven on. Allow the cake to cool for 10-15 minutes.

Now, while the cake cools, mix sour cream, orange juice and sugar. Pour this onto the center of the cake and spread evenly to the sides. I added some blanched slivered almonds. It goes back into the over for 5 minutes. Remove the finished cake from the oven and allow to cool thoroughly on a rack.

Of course, the topping as well as the almonds are optional. But one of the beautiful things about this and other toppings, aside from their flavor, is that they do a bang-up job of concealing any flaws, such as cracks, that may appear on the surface of the cheesecake.

Bon appétit!

Saturday, March 27, 2010

Peanut Butter Cheesecake III

Yes. Peanut Butter Cheesecake III. This month's payday cheesecake will be the same as last month's, except with milk chocolate ganache instead of raspberry jam. I made this for Susie's mid-month payday, but was troubled that there were tiny air bubbles in the ganache. Inquiries were made and I determined (read: guessed) that I whisked the hot cream and chocolate too vigorously, incorporating air into the ganache. A gentler, though not necessarily kinder approach would be used for this reprise.
I brought the cream and the butter just to a boil and poured it over the Ghiradelli milk chocolate chips. I let it sit for a few minutes and then went in with the whisk. It was a test of my patience to whisk gently. It just seemed oxymoronic. Wrong even. But I persisted.

I was sure there were still some chunks of unincorporated chocolate in the ganache, so I poured it through a strainer into a small bowl. There was some undissolved chocolate as I had suspected. It was quite tasty.

The ganache then cools to room temperature before being refrigerated to thicken for use. I want a viscous liquid that will spread slowly, without running. Pour the ganache over the top of the cheesecake and pop back into the fridge to set.

Bon appétit!

Baklava

I decided to make the baklava a full week in advance of my big Greek Easter meal. For two reasons. One, there just isn't a lot of free time in the evenings before Greek Easter, after this weekend, to get everything ready. And two, Thursday is the Edible Book Festival at the UO Library, and I need a piece of baklava for one of my entries.

Baklava (μπακλαβάς and pronounced bahk-lah-VAHS) is perhaps the most well-known Greek food. Well, let's not forget about gyros. But still. It is a simple recipe that can be anything but to assemble. Layers of phyllo dough, painted with clarified butter, a layer chopped walnuts, all soaked in a sweet rose-flavored syrup. The really daunting part of making baklava is working with the phyllo.

Sugar and water are boiled for a couple minutes and then two tablespoons of rose water are added just before removing from the heat. This is allowed to cool and then refrigerated until needed.

Process a couple cups of walnuts and two tablespoons of rose water in a food processor until very fine. Set aside.

Two cups of unsalted butter are clarified. I don't know any short-cuts for this. I simply use a spoon and skim the solids that rise to the surface while the butter is heated. There are still some solids at the bottom of the pan, so I carefully pour the clarified butter off into a bowl. If solids get into the clarified butter, they will burn and blacken when the baklava is baked.

Phyllo dough is paper-thin and dries out quickly, so a damp (not wet, just slightly damp) towel is laid over the sheets of dough while assembling the baklava.

Now the tough part. Brush some of the butter into a baking pan. Then lay a single sheet of phyllo in the bottom of the pan, cover the remaining sheets with the towel and brush butter on the sheet in the pan. Repeat this again and again and again until half the phyllo has been used. Then evenly spread the walnut and rose water mixture over the top. Then, you guessed it, back to the phyllo layers. Place a sheet, cover the rest, butter. Repeat until all the sheets have been used.

With a knife, carefully cut through the assembled baklava, first lengthwise in one-inch strips, and then on a bias to form the traditional diamond shapes. Actually, mine come out looking more like parallelograms. No worries. This is not a geometry exercise. Pour the remaining clarified butter over the top and spread it evenly with the pastry brush.

The pan goes into a 350° oven for 30 minutes. The temperature is then raised to 425° for an additional 10 minutes.

Remove the pan from the oven and pour the chilled sugar and rose water syrup evenly over the top. It will sizzle. Enticingly.

Bon appétit!

Tuesday, March 16, 2010

Peanut Butter Cheesecake II

After Susie and I were married I expanded the Payday Cheesecake program to include the good folks at Benton County Mental Health. They were grateful, and remained so even after they learned that just because they get paid twice a month, they were going to get one cheesecake and not two. This month they get dessert on the mid-month payday. I doubt they will feel slighted that they will be receiving the same recipe, for Peanut Butter Cheesecake, that I prepared for my co-workers a couple weeks ago.

The same recipe, with a twist. A variation really. Instead of raspberry jam to top the cheesecake, I went with a milk chocolate ganache. So, this post is really about making ganache.

I put 8 ounces of milk chocolate in a small mixing bowl. Then, over medium heat, I brought 3/4 cup heavy whipping cream and 2 tablespoons unsalted butter just to a boil. Immediately, the hot cream and butter was poured over the chocolate and whisked until smooth and shiny. Into the refrigerator to cool and thicken a bit.

After a couple hours, I poured some of the ganache on the top of the cheesecake, letting it spread close to the edge. There were tiny bubbles in the ganache and I neither knew how nor cared to try to smooth them out. I doubt anybody will notice, or care.

Bon appétit!

Sunday, March 7, 2010

Coconut Brigadeiros

An invitation to a going away party for a co-worker and a recipe from the New York Times seemed destined to wed. The recipe is for Coconut Brigadeiros, a Brazilian desert that looked both interesting and easy.

First, a note on the coconut. Use unsweetened finely shredded coconut. I found some at the local Asian supermarket. The sweetened baker's coconut available at stores is too sweet. So says the recipe.

Sweetened condensed milk, coconut milk, butter, corn syrup and coconut are brought to a boil over medium heat. The heat is reduced and the mixture is stirred constantly over low heat until it becomes fudge-like. The recipe says 8 to 10 minutes. It took me closer to 20. My low must be lower than the recipe's low. I turned the heat up a bit and that seemed to do the trick. The mixture became a single soft piece.

The mixture is slid into a bowl. Do not scrape the sides or the bottom of the pan. Any residue should be left behind. The recipe says so. So I obeyed.

I refrigerated the blob overnight and the next morning formed balls of the thick mixture. I use a small scoop to help ensure uniformity of size, finishing each ball with my hands.

The finishing touch was too roll each ball through some of the unsweetened coconut until completely coated. I did half this way, and rolled the other half through chocolate sprinkles. What the heck. Some very finely chopped nuts might be good as well.

Back into the refrigerator to firm up again. They can be stored at room temperature in a sealed container for up to two days. This just seems wrong. At least with the batch I made. They got a little too soft at room temperature. In the refrigerator they can keep up to a month. Like they'll last that long.

Bon appétit!

Sunday, February 28, 2010

Peanut Butter Cheesecake

I was sick at home this past payday so was unable to make a payday cheesecake. So instead of payday cheesecake on Friday, there would be workday-following-payday cheesecake on Monday. It should make Monday easier to handle for most.

I strode confidently off the recipe's path straight away. Instead of a crust of peanut butter cookie crumbs, ground peanuts, flour and butter, I used Nutter Butter cookies. I processed half a package into crumbs. The creamy cookie filling served as a binding agent. Then pressed the crumbs into the bottom of a parchment-ringed cheesecake pan. Then into the freezer and onto the batter.

The batter was pretty easy as well. Cream cheese, sour cream, peanut butter and sugar are mixed in the KitchenAid stand-up mixer for 3 minutes. Then four eggs are added, one at a time, followed by some vanilla. C'est tout!

There was a recipe for a topping as well. Sour cream, peanut butter, sugar, lemon juice and ground peanuts. Forget it. The minimalist simplicity of the cheesecake would do. That, or I was just feeling lazy. I mention the topping only as a suggestion. I am not trying to hide anything, else I wouldn't have said word one about a topping. Maybe just suggested some canned whipped cream. So there. OK. I changed my mind about a topping. I put some raspberry preserves on top. Just a little. Peanut Butter and Jelly Cheesecake?

Into a 350° oven for 45-55 minutes, let cool on a rack, refrigerate for several hours or overnight. Then eat.


Bon appétit!

Thursday, January 28, 2010

Blue Ribbon Cheesecake

I am the Party Boss. My self-imposed responsibility is to provide a dessert for a party every payday. The Payday Party is not so much a party as it is a dessert. I bring in something tasty, and people eat it. Sometimes someone brings something else as well. For the first few years as Party Boss, I made a different cheesecake every month. There were no complaints. Then I went off on a tangent. A tangent that led to Jelly Donut Pudding, halva, cobblers, baklava, and I can't remember what else. After a two-month hiatus due to the holidays and the Rose Bowl, the payday party returns on the morrow. And so does the cheesecake.

I made a recipe from 125 Best Cheesecake Recipes called Blue Ribbon Cheesecake. It is a simple recipe: cream cheese, sugar, eggs, lemon juice and vanilla, over a graham cracker crust. My stand mixer makes it a snap.

I have found that in using cheesecake pans, lining the sides with strips of parchment paper will produce a better looking finished product. After unmolding, simply peel the strips away. There are no marks where a knife was run around the inside of the pan. Just a trick I have learned over the years.

I topped this particular cheesecake with canned blueberry pie filling. It was easier, and it is January so I don't have access to fresh blueberries to cook down.

Bon appétit!

Wednesday, November 25, 2009

Upside-Down Pear Chocolate Cake

I bought another cookbook. This one is called Rustic Fruit Desserts and it is a feast for the eyes to skim through. With Thanksgiving just around the corner, tomorrow in fact, I wanted to supplement the dessert spread which usually consists of pies: pumpkin and pecan. The book is organized by seasons. Quite handy. I paid careful attention as I pored through the section devoted to fall fruits. And then I saw it. The Upside-Down Pear Chocolate Cake. It would fit nicely into a Thanksgiving spread. Not too ostentatious, yet elegant nevertheless.

I started by caramelizing water and sugar, then pouring the mixture into a buttered cake pan. Next I fanned sliced pears around the edge. The batter was pretty simple. Melt some butter and dark chocolate then transfer to a mixing bowl to which sugar and eggs were added in succession. Then alternately I added the dried ingredients and some whole milk. C'est tout!

Spread the batter on top of the pears and caramel, then into the oven for 40-45 minutes. Cool on a rack for a quarter hour, then invert onto the serving plate. Five minutes later, carefully remove the pan. Again, c'est tout!

We'll be seeing more from this cookbook. Much much more. Trust me.

Bon appétit!

Friday, October 30, 2009

Halloween Cookies

I bought a cookie press thinking ahead to the Christmas cookies I make every year. Lo and behold there was a pumpkin template. With Halloween just around the corner, I was off to the races. I made three batches: one following the recipe that was on the back of the cookie press packaging, one substituting lemon extract for the vanilla and almond extract, and one using maple flavoring. To color the dough I used equal parts of red and yellow food colorings. Somewhere between 1/2 tsp. and a full tsp. They came out of the oven warm and yummy. Susie decorated them with cheery little faces and stems. Little do the happy little cookies know of their fate. I do know. And I know I love my new cookie press.

Bon appétit!

Wednesday, September 23, 2009

Mexican Chocolate Cake with Nana's Frosting

Another co-worker is moving on to...different things. And that means I had to make something for the going away shindig. Yes, had to. I went with a fairly simple recipe for a Mexican Chocolate Cake. Mix the dry ingredients, add the wet ones, mix until smooth. 25 minutes in the oven and it's done. It was.

The picture doesn't really show the cake part. Just the frosting. And that Dear Reader is the point. The frosting recipe comes from my paternal great-grandmother, known to us all as Nana. She used it on her oatmeal cookies. I do too. And as cake icing. And to make a marvelous peanut butter and frosting sandwich. It is true. A fairly simple recipe. Butter, powdered sugar, cinnamon, and coffee. Caffeine and sugar. This gets one going in the morning. You'll just have to trust me.

I found that the cake, with chocolate and cinnamon, goes beautifully with the cinnamon and the coffee in the frosting.

Bon appétit!

Tuesday, September 15, 2009

Rainbow Cake

My grandmothers were my inspiration for cooking. They still are. My mom too, to be fair. All equally. Let's get that straight right away. The recipe for Rainbow Cake comes from my maternal grandmother. Typed with little annotations between lines and in margins. A true heirloom. It is essentially a butter cake batter with a twist. The batter is divided and dyed with food coloring. No two come out the same. Ever. They all come out looking pretty groovy. The picture here is a file photo from my archives. Today's version, still in the oven, has four colors. The pink, green and yellow seen here, plus blue. Blue food intrigues me. As kids we would eat one color, then the next and so on. Technically, we played with our food.

Bon appétit!

Sunday, September 13, 2009

Berry Cobbler

Again with the cobbler? Yes. Again with the cobbler. I am becoming convinced that just about any fruit or berry can be made into a cobbler. This time I used something called "Berry Medley" from Fred Meyer. I had a coupon. Blackberries, raspberries and blueberries. The fruit mixture seemed a bit high in the baking pan so I am glad I thought to put a pan under it. Just in case of overflow during baking. It did, but I achieved the same old result: delicious!

Bon appétit!

Wednesday, September 9, 2009

Strawberry Cobbler

Never heard of it? Me neither. Blackberry. Yes. Peach. Sure. Why not strawberry? Why not indeed.

Thicken the berries over heat with a little corn starch, a couple cups sugar, and a a splash of lemon juice. Pour berry mixture into a 9 x 13 inch baking pan and spoon the cobbler dough on top. It will expand so don't worry about covering the whole surface. In fact, you can't completely cover the surface. There isn't enough dough for that. Don't forget to sprinkle the top with a little sugar for a sweet, crunchy crust. 25 minutes in a 400-degree oven and it's done. Ready for vanilla ice cream to melt over it, blending with the berries. Mmmmm.

Now for the test. Delicious. I will reduce the amount of berries a bit next time. It's just a little too saucy. But then again, who would complain about too many strawberries?

Bon appétit!