Friday, May 14, 2010

Smoked Salmon

Ah. Smoked salmon. Who does not love smoked salmon? Even the devoutest of vegetarians might make an exception for good smoked salmon.

It has been a while since I last did this, but here goes. First, get a salmon. I have a great way for doing this. One of my Special Olympics athletes, Brian, is quite the fisherman. Two days ago he showed up at my door with a salmon in a plastic bag. A fifteen-pound salmon, give or take. (I did buy him an OREGON t-shirt that I'll give him at the baseball game tonight).

There would be a few firsts in this process. It was the first time I filleted a salmon with a real fillet knife. And it was the first time I filleted a salmon in our house, with its ample counter space. A few years ago, I struggled with a regular kitchen knife on the tiny bit of counter in my old apartment. Filleting a salmon is an art, one which I make no claims to having mastered. But I did find that given the proper knife, and enough space, the process went smoothly. Too smoothly?

I then cut the fillet into pieces, or slabs, about 1-2 inches thick. As I do this, a simple twist of the knife removes the skin from the fish. I like to leave the tail portion about six inches. No reason. I just like to.

The pieces of salmon are dredged thoroughly in a mixture of equal parts iodized sea salt and brown sugar. Really pack it around the fish. The pieces are placed on a waxed paper lined cookie sheet and refrigerated for a day or two. The salt and sugar draw out excess moisture from the meat in preparation for smoking.

Now, rinse the salt and sugar from the pieces of salmon. You cannot scrub too hard here. The sugar will have infused the fish. You just don't want it to be too salty. Place the salmon onto clean waxed paper and blot excess water with a paper towel. At this point I like to brush the fish with some maple syrup, and pop it back into the fridge overnight.

Now we are ready to smoke the salmon. Get the smoker ready to go and retrieve the salmon from the refrigerator. Place the pieces of fish on the smoking screens, allowing space between them. I give them another brushing of maple syrup before I pop them in the smoker.

I just use the store-bought smoker chips. Fill the chip pan, place the racks in the smoker, and...plug it in. After an hour I put new chips in the smoker pan. After two hours, the smoked salmon is done. Sometimes a little more, or a little less time. It depends on the consistency you're looking for. I like a caramelized outside with a tender inside.

Now the only thing left to do, is to eat it.

Bon appétit!

Monday, May 3, 2010

Savory Crêpes with Chicken, Asparagus & Sun-Dried Tomatoes

This is more of an assembly of recipes covered in earlier posts than a new recipe. My plan was to come up with something that wouldn't take too much time to prepare on a week night. For this dinner I'll use crêpes, but will omit the sugar from the recipe; roasted asparagus with reconstituted sun-dried tomatoes; fried chicken breast, cut into cubes; and store-bought chicken gravy from a jar.

First, Susie cooked the chicken. Then I made the crêpes. I spread a little kalamata olive paste on each prepared crêpe. Into each I laid a few asparagus spears, a bit of diced chicken, and some of the tomatoes. I nuked the gravy and drizzled a little over the assembled crêpes. Finally, I garnished with some chive flowers. Because I can. And that is it. Really.


Bon appétit!

Sunday, May 2, 2010

Crêpes with Strawberries & Whipped Cream

I am going to watch a couple hours of baseball on television this morning, and then go to a baseball game this afternoon. Something needed to be done to keep things running smoothly at home. The answer: Sunday morning strawberry crêpes. With whipped cream!

The batter is as simple as it gets: 2 eggs, 1 cup milk, 1/2 cup flour and 2 tablespoons sugar. Whisk the eggs and then add each ingredient in succession, fully incorporating each one as you go. A blender would work fine as well. I went with the whisk just to keep clean up to a minimum. Refrigerate the batter for an hour. Or not. Chilled batter is easier to work with during the cooking portion of the recipe.

I melted a little butter and had it at hand as I prepared to cook the crêpes. I brushed a little butter in a nine-inch frying pan. Then I used a 1/4 cup measuring cup as a ladle and poured a nearly-full scoop of the batter into the center of the pan. I rolled the pan to spread the batter evenly across the bottom. After a minute or so, I used a spatula to loosen the edge of the crêpe and, using my fingers, gently lifted it from the pan, turned it, and returned it to the pan and the heat to cook the other side. Another minute or so. Remove the crêpe from the heat to a plate and repeat until the batter has been exhausted. This recipe made 9 crêpes. Four for each of us, and one to wolf down when Susie wasn't looking.

For the filling, we had some strawberries from last season. In the freezer. Susie took them out to thaw last night. This morning she added a little sugar to them.

I placed some of the sweetened strawberries in the center of a crêpe and folded it into quarters. Four of these filled a medium plate nicely.

I am all about convenience. Some times. For the whipped topping, I used canned whipped cream. It would just be easier than whipping and sweetening cream. Clean up would be easier as well. For Susie. (Unwritten agreement: one cooks, the other cleans. Most of the time.)

Bon appétit!

Tuesday, April 27, 2010

Mandarin Orange Cheesecake II

"Again?" You may ask. Yes. Again. The previous Mandarin Orange Cheesecake was for Benton County Mental Health. They were test subjects. Very willing test subjects.

For my payday cheesecake, I modified a few of the steps. Two.

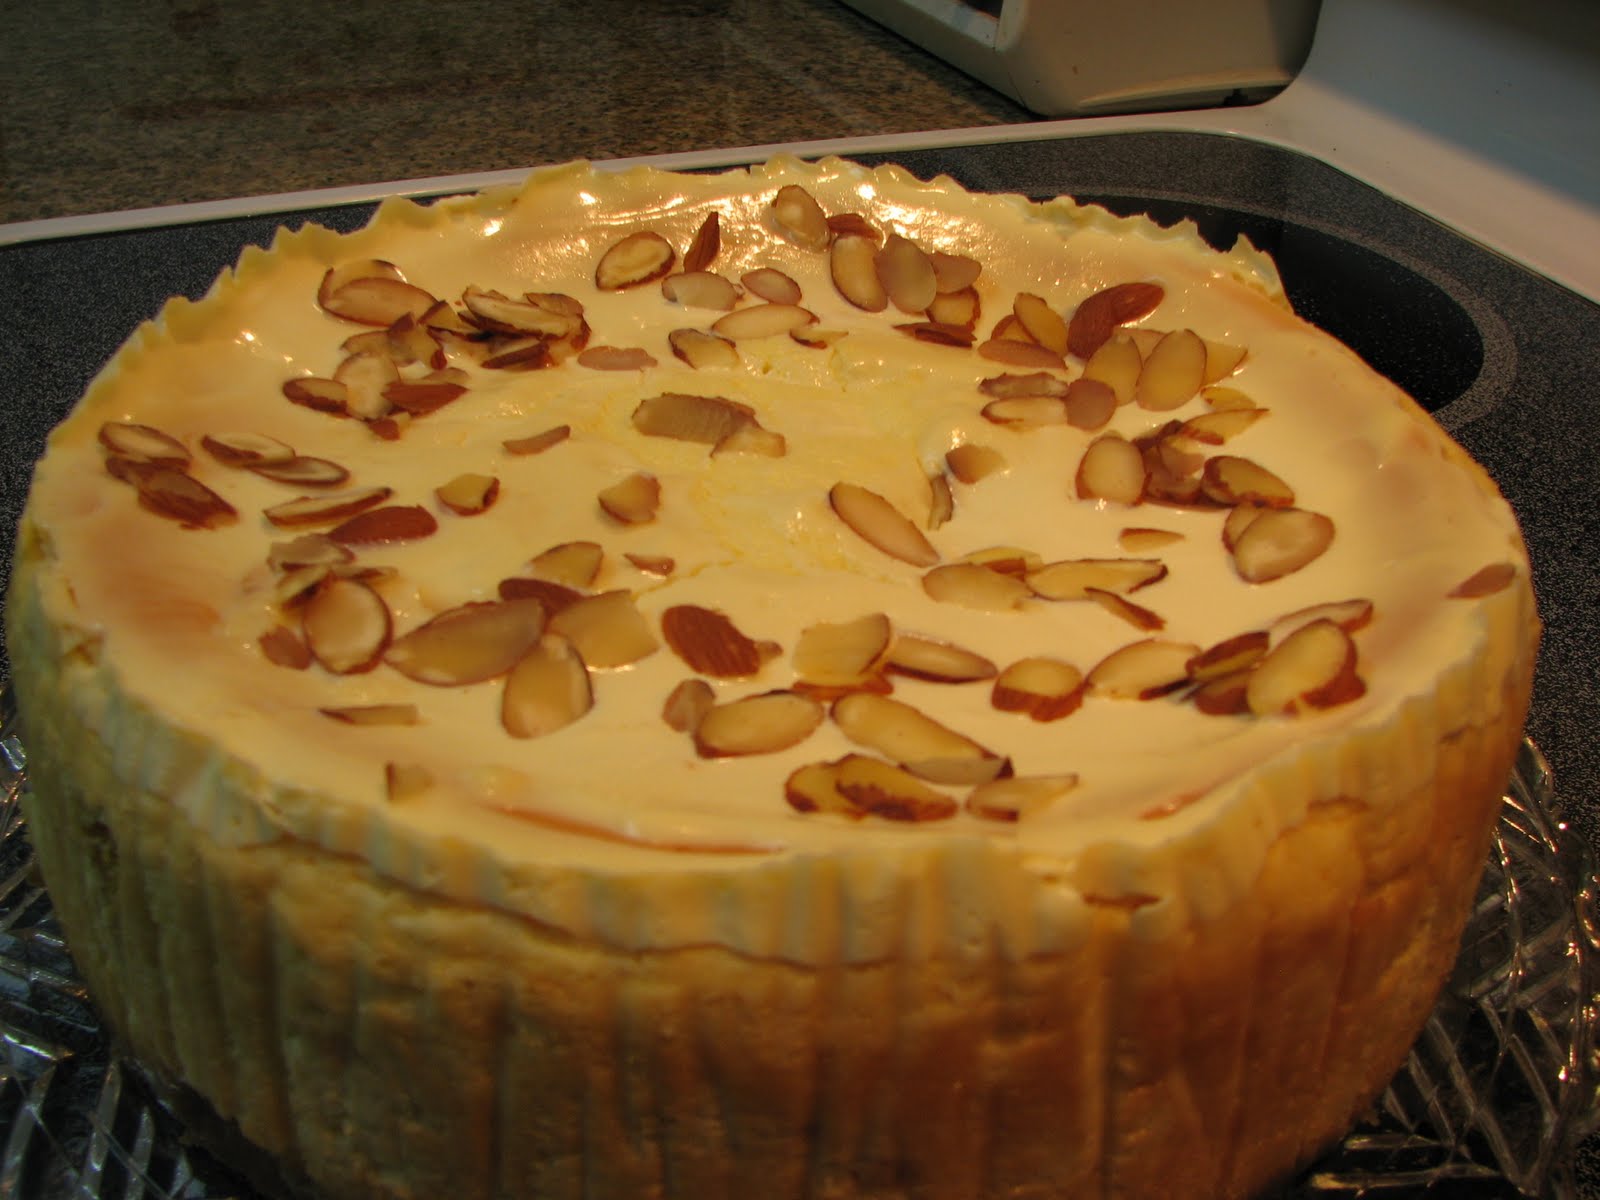
First, instead of folding the mandarin slices into the cheesecake batter, I poured half the batter in the pan. (Remember to line the sides with parchment strips!) Then I set the orange slices on top, spacing them over the surface. Then I added the rest of the batter.

Instead of blanched slivered almonds, I used sliced almonds. I just wanted a better contrast on the surface.

Now, the trouble. When I poured the topping onto the center of the cheesecake prior to spreading it evenly across the top, it slumped into the cake. In my attempt to spread the topping, the aesthetic quality I was hoping for was lost. The taste would not be affected though, unless you were the person who got a slice with an intrusion of extra topping. Oh bother. You can't win them all. I doubt there will be complaints.

Bon appétit!

Tuesday, April 13, 2010

Mandarin Orange Cheesecake

This month's cheesecake for the good folks at Benton County Mental Health is a Mandarin Orange Cheesecake. I made one a few years ago and decided it was time to make another. To improve on the original.

Remember to line the pan with strips of parchment paper to facilitate removal of the finished cake.

Starting with the crust, I used vanilla wafer crumbs instead of graham crackers. Why not? Just to be different. A deviant. Melted butter is worked into the crumbs and then this is pressed into the bottom of a 9-inch cheesecake pan. Pop it into the freezer while the batter is made.

The batter consists of cream cheese, butter, and sugar, beaten at medium-high speed for a few minutes. Have I said lately how much I love my stand-up mixer? I really do! Eggs are added, one at a time. Then sour cream, vanilla and concentrated orange juice. After this has all been mixed well, a can of drained mandarin orange sections is folded in. The batter is poured over the frozen crust.

The cake bakes at 350° for 45-55 minutes. Just until it is starting to brown ever so slightly, and there is a little jiggle left in the center when the pan is gently shaken. Remove from the oven and leave the oven on. Allow the cake to cool for 10-15 minutes.

Now, while the cake cools, mix sour cream, orange juice and sugar. Pour this onto the center of the cake and spread evenly to the sides. I added some blanched slivered almonds. It goes back into the over for 5 minutes. Remove the finished cake from the oven and allow to cool thoroughly on a rack.

Of course, the topping as well as the almonds are optional. But one of the beautiful things about this and other toppings, aside from their flavor, is that they do a bang-up job of concealing any flaws, such as cracks, that may appear on the surface of the cheesecake.

Bon appétit!

Monday, April 12, 2010

Stir-Fried Iceberg Lettuce with Shrimp

Iceberg lettuce is the bastard child of the lettuce family. Prior to making this recipe I cannot remember the last time I bought a head of it. It is just so much nothing. Well, water.

I came across this dish in the New York Times and thought it looked interesting, and easy enough to give it a try.

Shredded iceberg lettuce and scallions are stir-fried over medium-high heat until the lettuce has cooked down. I still had some leeks from the garden so I used them instead of scallions. The greens are set aside on a plate.

Turn the temperature down to medium. Garlic and ginger are then sautéed a bit and the shrimp are added. This is cooked until the shrimp are no longer translucent and are bright pink. This takes two or three minutes.

The lettuce and leeks are then added back into the wok. I deviated from the recipe and also added some softened rice noodles. Finally, a mixture of corn starch, sugar, rice wine, soy sauce and sesame oil is added. This is cooked until the sauce thickens.

The verdict is that the dish is good. Not great. Just good. It was somewhat bland. I plan to try this again, but will add something to add a little more flavor.

Bon appétit!

Sunday, April 4, 2010

Tzatziki

No Greek meal is complete without tzatziki (τζατζίκι, pronounced dza-DZEE-ke), the yogurt garlic dip that goes splendidly with pita bread wedges.

I usually strain plain lowfat yogurt overnight to remove the whey, leaving the yogurt thick and creamy. This time I used Greek yogurt. It is already thick and doesn't need to be strained.

Olive oil and lemon juice are whisked together and the yogurt is folded in until well incorporated. Garlic and some grated cucumber are added and... that's it. Set aside to allow the garlic to permeate the yogurt.

Serve with triangles of pita bread.

Bon appétit!