Another idea from the 12 days of cookies feature I stumbled across. Almond & Pine Nut Cookies. Looked simple enough. Why not? As with most of my holiday cookie production, I doubled the recipe.
First, I got past what I deemed a bit of pretentiousness on the part of the contributor (organic free-range eggs, high-quality vanilla extract, superfine sugar). I use eggs, vanilla and sugar. But that's just me.
Almonds and pine nuts are roasted in a 350° oven for five minutes. A couple handfuls of these are reserved for later. The rest go into a food processor and turned into a coarse powder.
The rest of the ingredients are then added directly. Well, almost all of them. Flour, sugar, brown sugar, butter, vanilla, eggs, baking soda. I think that's it. This gets processed until a pasty dough is formed. This is where I ran into a bit of trouble. Doubling a cookie recipe in a food processor just doesn't work well. Fortunately, the mess was minimal as I transferred everything to a mixing bowl and finished the job with my hand mixer.
Oatmeal is added, and then the reserved nuts, after rough chopping them first.
The dough was absolutely delicious. But it is probably better to form one-inch balls and place them on a cookie sheet. Or use a couple spoons. Do not flatten, even a little, the balls of dough. They bake at 350° for 10 minutes. Let them rest on the cookie sheet for a couple minutes after coming out of the oven. They are very soft and delicate, but firm up quickly.
There is an almost savory flavor to these cookies, as a counterbalance to the sweetness of the sugar. Yes. Plain old sugar. They are now officially admitted to my pantheon of holiday cookies, and will be made every year.
Sorry. I forgot to take a picture.
Bon appétit!
Wednesday, December 15, 2010
Monday, December 13, 2010
Rugelach
I expanded my holiday cookie repertoire this year. To truly make it a "holiday" array of cookies, I looked up a recipe for rugelach in my Jewish Holiday Cookbook. I tried my hand at these tasty morsels before, with a limited degree of success. I was confident I could improve on the final result. Well, hopeful that I could.
The dough is made from cream cheese, butter and flour. That's it. The dough is quite thin and gets covered with plastic wrap and refrigerated for at least two hours. At least. I let it chill for five hours. Until it was almost rock hard.
After struggling to remove the dough from the bowl, I cut it into four equal parts. Actually, eight because I had doubled the recipe. Each section is rolled out into a circle approximately nine inches in diameter. I brushed the circle with melted butter and sprinkled it with cinnamon sugar.
With the side of a spatula I cut the circle into 16 pizza-like slices. Then, starting with the outer edge, I rolled each slice into a crescent roll shaped morsel.
Line a cookie sheet with parchment, or a Silpat and space the rugelach a couple inches apart. Bake at 350° for 25 minutes, rotating the cookie sheet after 15 minutes.
Remove to cooling racks and enjoy. Really enjoy!
 Bon appétit!
Friday, December 3, 2010
Rapid Pull-Apart Rolls
I was watching the Cooking Channel today. I do that from time to time. And time and again. The show Kelsey's Essentials came on, and as I lay back on the sofa to watch a half hour of quick bread recipes, I became intrigued. The recipes were actually for rolls, but you'll have to indulge me. Won't you? After the first recipe, for quick pull-apart rolls, I decided to act. It's Friday, and the thought of oven-warm rolls dripping with butter and jam was too tempting. It all looked easy enough.
Preheat the oven to 400° right off the bat. You'll see why later.
In the stand-up mixer bowl, three tablespoons of yeast is covered with 1.75 cups warm water and allowed to sit for five minutes. A half cup of honey is stirred in, followed by 1/2 cup melted butter, with the mixer on low speed, using the paddle attachment. Next come two beaten eggs and two teaspoons salt.
After this is nice and mixed, four to six cups flour are added slowly, until the dough starts to pull away from the sides of the bowl. I used the full six cups, and still needed to add more. At this point I switched to the dough hook and added more flour, a spoonful at a time, until the right consistency was achieved.
The dough is placed on a work surface and divided into 24 portions, formed into balls and placed in baking pan or an oven-safe skillet. I used a baking pan. The tray of dough balls is covered with a towel and placed on the oven, to rise for 20 minutes. This is called proofing and the warmth from the preheating oven will aid in this.
After the dough balls have doubled in size, they are brushed with melted butter and put in the oven for 25 minutes, until golden brown. Another brushing with melted butter after they come out of the oven and they are ready to eat.
These were simply yummy!
 Bon appétit!
Friday, November 19, 2010
Puff Pastry Chicken Fajita Braid
Inspired by something I saw on the Cooking Channel, the main difference in my version is that I used a puff pastry sheet instead of Pillsbury crescent roll dough.
Chicken breast is cut into 1 by 1 by 1/2-inch strips. Or thereabouts. A little vegetable oil is heated in a skillet and the chicken is added, along with some chili powder, salt, and garlic. I also added a splash of chipotle marinade for a little, just a little extra kick. Sliced onion, and strips of red add green bell peppers are added. When the chicken is cooked through, remove from the heat.
Line a baking sheet with a silpat. Now spread out a sheet of thawed puff pastry dough. Yes, on the silpat. Spread the chicken and vegetable mixture on the center third of the pastry sheet. Spread about a quarter cup of salsa over the top. Sprinkle with grated jack and cheddar cheese.
Now the tricky part. Or as tricky as any part of this recipe gets. With a knife, make cuts one inch apart on the long sides of the pastry sheet not covered with the filling. Careful not to cut into the silpat! Carefully life the strips of dough, alternately, and cross them over the filling, to form a roll. Gently press the opposing edges to seal. Finally brush the top of the roll with a little egg wash.
Bake at 375° for 20-25 minutes until the top is a deep golden brown. Cool for a few minutes. To serve, cut crosswise into slices. When I entered this into Weight Watchers recipe builder, I figured 8 servings and that came to five points. Goody! I can have two servings.
 Bon appétit!
Monday, November 15, 2010
Sweet Potato Cheesecake
It was suggested that I make a seasonal cheesecake this month. I immediately thought of the Caramel Apple Cheesecake, but not only have I made it a couple times, but it is a very labor-intensive recipe.
A co-worker suggested a vegetable cheesecake like pumpkin. Yawn. I forget exactly how I settled on sweet potato, but I did. I did a google search and the first recipe that popped up look good.
A graham-cracker crumb crust is used. Instead of freezing the crust, it is popped in the oven for ten minutes. The crust is set aside to cool.
To save time and effort, instead of baking sweet potatoes, peeling them, and then pureeing them, I simply used a can of sweet potatoes and mashed them down into the measuring cup.
The mashed sweet potatoes are mixed with cream cheese, sugar, sour cream and heavy cream until smooth. Three eggs are added, one at a time, and mixed at fairly low speed until incorporated.
The batter is poured over the crust and placed in the oven at 350° for an hour. The oven is turned off and the cake rests in the oven with the door ajar for another hour.
Now the topping. In a saucepan, butter and brown sugar are heated until melted. The heat is increased and the mixture is brought to a boil. Heavy cream is added followed by chopped pecans. This is poured over the cheesecake and then refrigerated. The topping concealed the small cracks that developed in the surface of the cake.
I don't have a verdict on how this tastes yet, but if the batter I licked of the mixing paddle is any indication, it is delicious!
 Bon appetit!
Wednesday, November 10, 2010
Tinga Pueblana & Green Rice
Again with the Cooking Channel? Yes. Again with, or rather, from the Cooking Channel. From the same episode in which I found the Mexican Corn Soup.
Tinga Pueblana is Mexican Pulled Pork, and the recipe says prep time is 15 minutes. Maybe on Jupiter. It became a lot more involved that I had anticipated. But, in the end, it was well worth the effort.
Two large russet potatoes are boiled, then diced and set aside.
Pork loin is placed in a large pot of cold water along with an onion half, garlic and bay leaves. This is brought to a boil and the heat reduced to low. The meat simmers until it is cooked through and no longer pink. This took about an hour, though the recipe says 45 minutes. No big whoop. The meat is set aside and the cooking liquid is discarded.
When the pork is cool enough to handle, it is shredded, either with fingers, or with a couple forks. I tried both methods, and settled on my fingers as the most effective method.
In a large skillet, chorizo is sauted until cooked through, removed to a paper towel-lined plate and onions are softened in the chorizo grease. The shredded pork, canned diced tomatoes and finely diced chipotle chiles are added to the pan and cooked until the tomatoes begin to break down. Five to ten minutes. Remember the potatoes? They are now added to the pan, along with the chorizo. Finally, some apple cider vinegar, dried thyme & marjoram are added. This cooks until some of the liquid has evaporated. Another five to ten minutes.
I served this with warmed flour tortillas, and Green Rice, the recipe for which is coming up next. Now even.
Chicken broth, poblano peppers and cilantro are pureed in a blender, and set aside.
In a medium saucepan, diced onion is sauteed in corn oil until translucent. Garlic and white rice are added to the pan and cooked for a minute while stirring. The green puree is added and brought to a boil. Reduce the heat to low and cook until the liquid is absorbed and the rice cooked through and tender. The recipe says about fifteen minutes. After 25 minutes the rice was not quite done, but my impatience got the better of me. And everything else was getting cold.
The pork was spectacular. The rice needed something. Perhaps complete cooking. I liked the rice despite a slight crunch. Susie didn't care for it at all. But she loved the pork.
 Bon appétit!
Mexican Corn Soup
When I saw this on the Cooking Channel, it looked like a tasty, and easy soup to make. I was correct.
Corn, tomatoes, chicken broth and oregano are pureed in a blender, and then set aside. In a large saucepan, bacon is cooked until crisp. The bacon is removed and onion is softened in the bacon fat. Garlic is added and cooked for an additional minute.
The tomato-corn puree is added to the pot, along with additional chicken broth. This is brought to a boil and more corn is added. This simmers until thickened, stirring occasionally, about 20 minutes. The recipe calls for any foam that develops to be skimmed off and discarded. I didn't bother.
The soup is finished with some heavy cream and some chopped flat-leaf parsley. Rather than garnish with crumbled bacon, I just mixed it into the soup, after crumbling it. I garnished with a small dollop of sour cream, and a bit of flat-leaf parsley.
This came out superbly! I loved it. Susie loved it! No doubt the dog would have loved it as well, had we been willing to share.
 Bon appétit!
Thursday, November 4, 2010
Deep-dish Polenta Pie
My inspiration for this came from a Weight Watchers' recipe. Even the name. I added a few things. I love polenta! You can do so many things with it. And I can too.
Milk (1%), water and salt are brought to a boil. The heat is reduced to medium-low and yellow corn meal is slowly drizzled in while whisking continually. Continue whisking until the polenta thickens to the consistency of mashed potatoes. This takes about seven minutes. Stir in a tablespoon butter and three tablespoons grated Parmesan cheese.
Away from the heat, the rest of the ingredients are mixed in. Chopped broccoli, diced cooked chicken, reconstituted sun-dried tomatoes, chopped garlic, and chopped onion. Mix thoroughly until all the ingredients are well coated with the polenta.
The mixture is pressed into a lightly-oiled 10-inch deep-dish pie pan. I used a spring-form. A tablespoon of grated Parmesan is sprinkled over the top. It bakes at 400° for 35 minutes. Allow to cool for at least 30 minutes. Or serve at room temperature.
This makes eight servings, each of which counts as 4 Weight Watchers' points. Just 4! At that rate, you may have seconds! If you've been good.
I served each slice with a spoonful of salsa and a couple slices of avocado. Absolutely yummy!
 Bon appétit!
Thursday, October 28, 2010
Ginger Honey Cheesecake
In fact, the name of this cheesecake is Honey & Ginger Cheesecake. My rework of the name is a nod to Gilligan's Island. You fill in the rest. This is the penultimate payday cheesecake I will make for work. After five years of cheesecakes and other payday desserts, I am calling it quits.
The crust for this cake is made with ginger snap crumbs and melted butter. The crust mixture is pressed into the cheesecake pan and then it is frozen.
The batter begins with two packages cream cheese and a cup of sour cream. I have been struggling lately with cracks appearing on my cheesecakes, so I mixed the cheese and cream on medium-low speed, to minimize the amount of air that would be incorporated. Next came flour, brown sugar and honey. When that was fully blended in (again on slow speed), two eggs were added, one at a time, until fully incorporated. Ground cinnamon and ginger were mixed in next. Finally, the recipe calls for candied ginger, minced. Well, I have some ginger candy. That would have to do. I chopped it up and folded it into the batter. By hand.
The batter is poured over the frozen crust and bakes at 325° for 55-65 minutes. I lowered the temperature by 25° from what the recipe said because I read that 325° was at the upper maximum for baking cheesecakes, without cracking them. Or drying them out.
After an hour, I removed the cake from the oven, only to find a crack. A fairly small one, but a crack nonetheless. Not the yawning abyss that developed on the cheesecake I made for Benton County Mental Health earlier in the month. But a crack nonetheless.
 Bon appétit!
Monday, October 25, 2010
Quick & Spicy Tomato Soup
We had to have more than just the Linguine with Shrimp & Lemon Oil. Didn't we? From the same episode of Everyday Italian, hosted by Giada De Laurentis on the Cooking Channel, I made Quick and Spicy Tomato Soup.
Olive oil is heated in a large soup pot. Carrots, onion and garlic are added and cooked for two minutes, or until soft. A jar of marinara sauce, two cans of chicken broth, a can of butter beans, a cup of mini farfalle patsa, salt, pepper and achiote (a spice used in Cuban cuisine) are added. This simmers for ten minutes, and is ready to serve. I sprinkled a little grated Parmesan cheese over the top of my bowl.
It was delicious. And, as importantly, quick and easy.
 Bon appétit!
Linguine with Shrimp & Lemon Oil
This dish is as seen on the Cooking Channel. Again. A light, quick and easy entrée that can be whipped up in a jiffy. And again, I diverged from the original recipe in places.
A couple hours ahead of time I zested a lemon into some olive oil. Then I watched some television.
When it was time to get down to it, I boiled some salted water in which to cook the linguine. The pasta is cooked until al dente.
While the pasta cooks, olive oil is heated in a large skillet. Sliced scallions and garlic are added and cooked until softened. Shrimp are added and cooked until pink. This takes about five minutes. To the skillet are then added the cooked, drained linguine, lemon juice, lemon zest, salt and pepper. This is tossed to combine. Arugula and chopped flat-leaf parsley are then added. The lemon zest is strained from the olive oil and the oil is added to the skillet and tossed to coat the pasta. The zest is discarded.
That's all there is to it. I told you it was quick and easy.
 Bon appétit!
Wednesday, October 20, 2010
Panko Pork and more
I recently started getting the Cooking Channel with my cable television package. It is the default channel when there is nothing riveting on TV. I watch it often. Chef Roger Mooking has a show called Everyday Exotic and that is where I was inspired for this dinner. He prepared Panko Schnitzel with Apple Salsa and Roasted Cauliflower. I deviated slightly from the recipes. Here and there.
I made the apple salsa first. Two Granny Smith apples are cored and diced. A celery stalk is also diced, smaller that the apples. Really tiny. I don't care a lot for celery so the smaller the dice, the further from my mind would it be as I ate it. Apple cider vinegar and honey are added and mixed in until the apples and celery are coated. Chopped tarragon finishes the salsa. I deviated here by not adding chopped fresh mint. I just didn't have any on hand.
Next I prepared the cauliflower. Vegetable oil, chopped garlic and cumin are mixed well. Cauliflower florets are added and tossed until they are coated. This is poured into a baking dish and few pieces of butter are placed on top. Panko is sprinkled over the top. This roasts in a 425° oven for 20-30 minutes, until the panko is golden and the cauliflower is al dente. Chef Mooking used whole cumin seeds that he ground coarse. I didn't. I simply used powdered cumin. It was, afterall, a week night.
Schnitzel requires pounding out pork cutlets until they are very thin. I didn't have any desire to do this. Nor did I need to. The pork I had purchased was already less than a half-inch thick, and would suffice. Each cutlet was dredged in flour, dipped in beaten egg, and breaded with panko crumbs. They are pan fried in vegetable oil over medium-high heat for about five minutes a side. The breading will be a deep golden brown.
We simply loved this meal! The pork was tender and moist. The breading light and crispy. The salsa was a nice variation from applesauce on pork chops. And the cauliflower was just amazing. Susie was more than willing to finish cleaning the dishes after she ate.
 Bon appétit!
Friday, September 17, 2010
Quick, Colorful & Easy Dinner
I decided to surprise Susie by having dinner almost ready to serve when she got home today. But, it is a work day so I didn't want to get in over my head with prep work. Hmm. What to make? I settled on some frozen four-color, five-cheese ravioli from Costco as the basis for the meal.
Instead of using a sauce, I decided on some dried heirloom tomatoes from the jar on the shelf. I boiled these for a few minutes, let then sit for another few minutes, then poured them into a strainer. (The plan is to cook the pasta when Susie gets home, add the reconstituted tomatoes, then toss in some grated Parmesan cheese).
My inspiration for the salad came from the classic Greek horiatiki salad. I whisked together a tablespoon of red wine vinegar, two tablespoons of lemon juice, and a quarter cup of olive oil. From the herb garden I picked some oregano, then microwaved it until it was dry and crumbly. I mixed the oregano into the dressing. I picked a couple cucumbers from the garden, and a couple handfuls of a few different cherry and pear tomatoes. I peeled then sliced the cucumbers thinly and added them to the dressing. Next, I halved the tomatoes and added them. I tossed the salad with a rubber spatula and placed it in the refrigerator.
There is a bird-seed roll from the Metropol bakery. I quartered the roll and toasted it. I still have some aioli that I made last weekend to serve with the roll. The aioli is really garlicky. Really, really garlicky, so I'll serve butter for Susie. As for me, I'll have no worries about vampires.
Put all together, these elements make up a very colorful meal. But, almost as importantly, a very quick and easy meal.
 Bon appétit!
Sunday, September 12, 2010
Minty Chocolate Cheeecake
The mid-month cheesecake for Benton County Mental Health is due Wednesday. I have bowling practice tomorrow. Tuesday, the night before wouldn't work. Just in case. I needed to make it today. First I needed to decide which kind of cheesecake to make. I flipped through my cookbook, but did not get very far. The sixth recipe in the book of 125 Best Cheesecake Recipes precisely. The Minty Chocolate Cheesecake.
I lined the sides of a 9-inch cheesecake pan with parchment paper. For the crust I used chocolate stuffed Oreos. Double stuffed chocolate Oreos. The cream filling serves as a binding agent for the crumbs, and the butter can be eliminated from the crust. I pressed the crumbs into the pan and popped it into the freezer.
I set out the rest of the ingredients, in order to let the eggs, sour cream and cream cheese to let them reach room temperature. This allows for better mixing of ingredients, and will allegedly help prevent cracking of the finished cheesecake.
Then I went back to watching baseball on a Sunday afternoon. For a few more hours.
The cream cheese and the sugar are mixed for three minutes. Eggs are added, one at a time. Then flour, sour cream, vanilla and peppermint extract are added. Three ounces of melted chocolate are then streamed into the batter, with the mixer running.
Finally, a cup of semisweet chocolate chips are mixed with a spoon of flour and then folded into the batter. I had some green mint chips, so I let my inner anarchist run free and substituted the green mint chips for the chocolate ones. (I know. I know. But I am not as young as I once was).
The cheesecake bakes at 350° for 45-55 minutes, until the top is light brown and there is a slight jiggle at the center.
Well, this is a bit embarrassing. A crack did develop on top of the cheesecake. Fortunately, it won't affect the taste, and these get eaten so quickly that the crack will swiftly become little more than a memory. A trivial one.
 Bon appétit!
Thursday, September 2, 2010
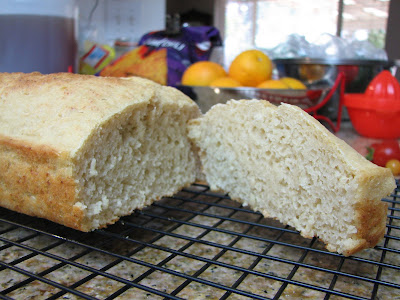
Beer Bread
In the Moving Guide section of the back to school issue of the Oregon Daily Emerald, a recipe caught my eye. Beer bread. It didn't catch my eye because of "beer," but because it billed itself as so simple to make, a dorm-dweller could make it.
Three cups flour, 4 tablespoons active dry yeast and 2 tablespoons of sugar are whisked together. A 12-ounce bottle of beer is added. I used a hefeweizen. That is it!
The batter is poured into a greased loaf pan and bakes at 350° for 45 minutes. Again, that is it!
While the other bread recipes, more traditional and not so traditional, produce a better result, I am not going to bash this one. It was OK. Good even. But nothing to rave about. Bummer. Maybe with a pale ale instead of hefeweizen. Maybe with a little ham or other deli meat.
 Bon appétit!
Saturday, August 28, 2010
Quick Pesto Pasta Salad
In need of a side dish, I thought quick. Or I quickly thought. Whichever. I have a variety of pastas in the cupboard. That's a start. Hmm. Let's see. Lots of homemade pesto. Sun dried tomatoes. Some diced prosciutto from when I made that pizza last week. And pitted kalamata olives as well. I think I have all I need.
I prepared a package of farfalle pasta. While the pasta cooked, I reconstituted some dried tomatoes by adding boiling water to them in a bowl. After draining the pasta, I added pesto, a bit at a time, and stirring until the farfalle was coated to my liking. I mixed in the prosciutto, chopped olives, and the tomatoes. Finally, I mixed in some grated Parmesan cheese. A pasta dish is just not complete without at least a little Parmesan. Seriously folks.
The result was, is, simply delicious. Especially when considering how minimal the effort to make it was.
 Bon appétit!
Friday, August 27, 2010
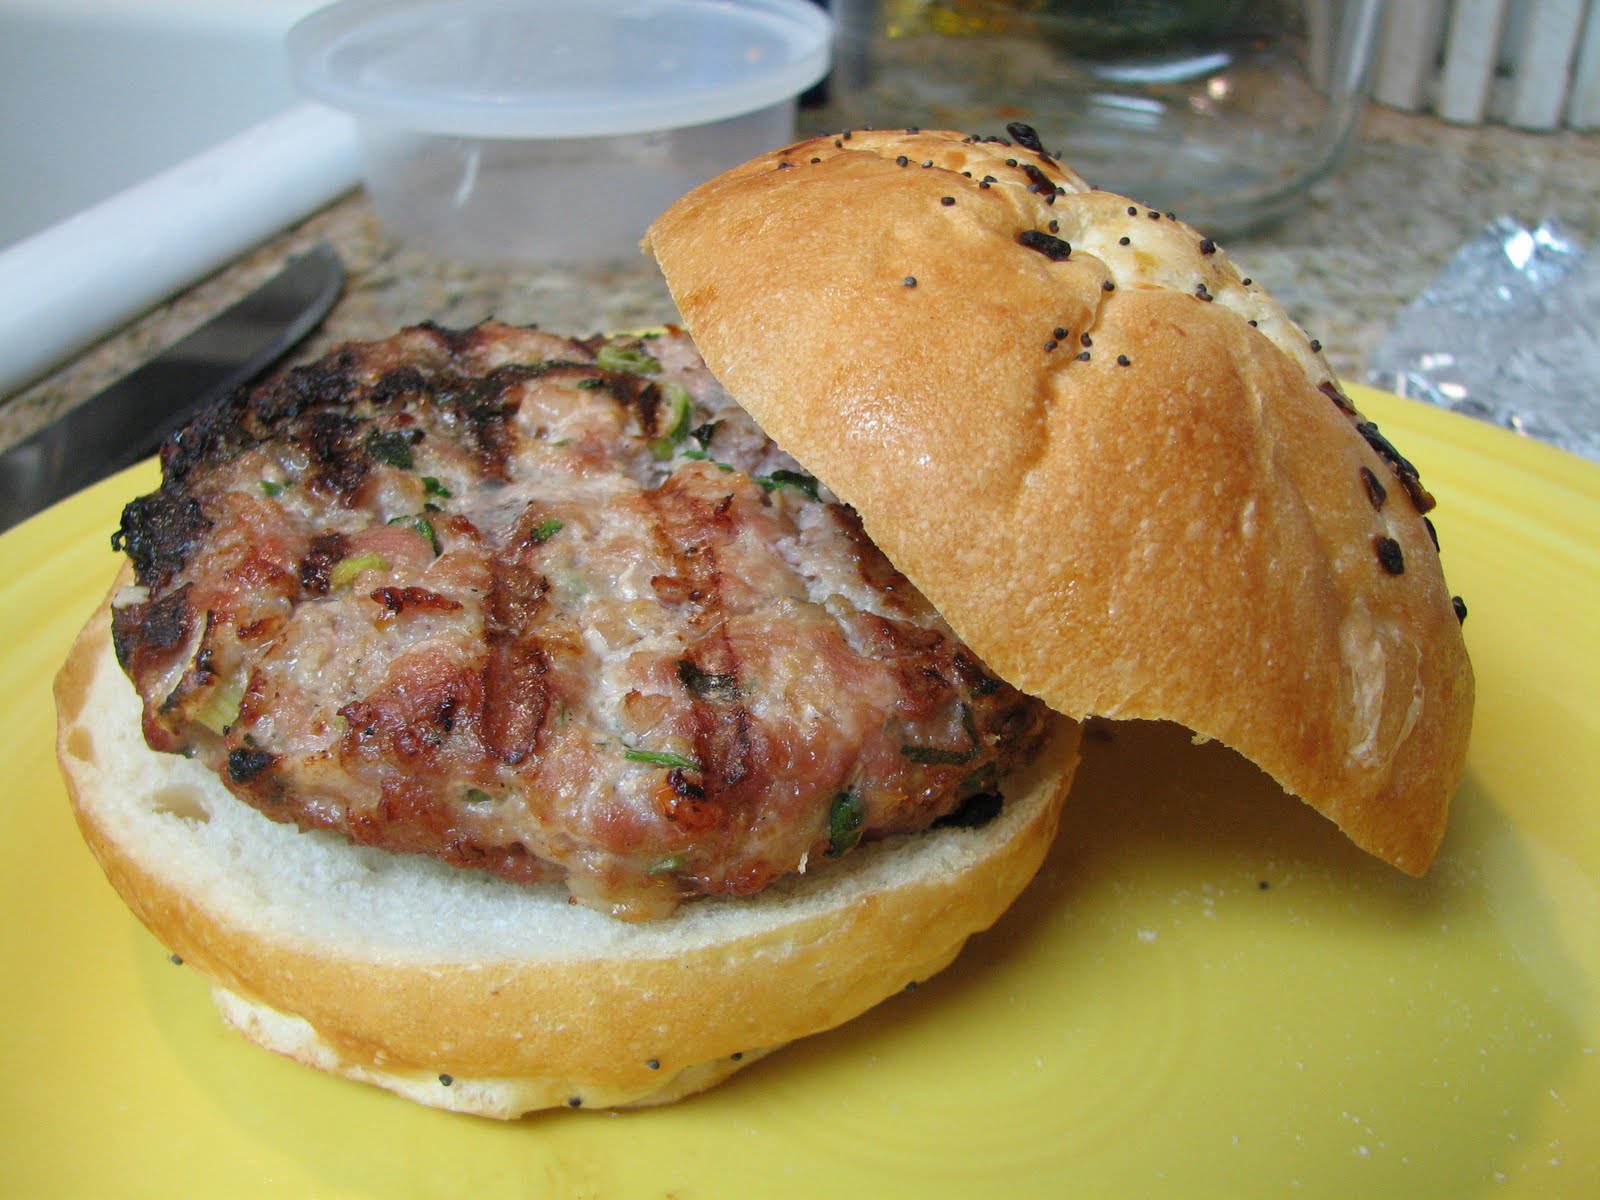
Shu Mai-Style Burgers
A while back, in the venerable New York Times, I came across a recipe for something called Shu Mai-Style Burgers. The recipe was part of a larger article on how to get out of the plain old hamburger rut. This particular recipe looked really good. And there was a picture too!
One and a half pounds of boneless pork shoulder, with the fat, is ground. (A couple Christmases ago I received a grinder attachment for my KitchenAid stand mixer. Maybe it was a birthday. Father's Day?) A half pound of shrimp are chopped up pretty finely, but not until mushy. The shrimp is added to the ground pork. Garlic, ginger, soy sauce chopped scallions and cilantro are added. Salt and pepper to taste finishes the mixture. I used my hands to mix everything together thoroughly.
I then formed the meat into six patties and placed them on a cookie tray and then into the refrigerator overnight.
On grilling day, or rather, eating day, I fired up the grill. All burners, all the way up. I placed the patties on the grill and let them cook for five minutes before turning them. I allowed them another five minutes on the second side, and after checking that they were cooked through, removed them from the grill.
These burgers are very flavorful and, in my opinion, do not need much in the way of condiments. I put a little (just a little!) barbecue sauce on a Kaiser roll I had sliced in half. Then came the burger, finished with a couple pieces of lettuce from the garden. And that is all. No mayo, mustard, relish, or anything else. And it was simply delicious! Just incredible.
 Bon appétit!
Saturday, August 21, 2010
Belgian Waffles
I'm not sure why, but I woke up this morning thinking about Belgian waffles. Not just eating them, but making them. There's something sorta zen about using a waffle iron. I went to an on-line recipe site and searched for Belgian waffles. There were two hits. After looking each over I went with the recipe that used yeast instead of self-rising flour. I have yeast.
The yeast is dissolved in some warm milk and set aside until creamy. Egg yolks, melted butter and more warm milk are whisked together. The yeast mixture is added along with sugar, salt and vanilla.
At this point, I used the electric mixer to whip egg whites until soft peaks formed.
Back to the batter, this time with the electric mixer. More warm milk, and flour are mixed in, alternately, "ending with the flour." That "ending with the flour" direction kind of irked me. Just a little. Why end with the flour? Why not the milk? What would happen if I just happened to end with the milk? What if I deliberately ended with the milk? Who would even know if I ended with the milk? Susie was still in bed, so it could be my little secret.
I ended with the flour.
The beaten egg whites are then folded into the batter and the bowl is covered tightly with plastic wrap, placed in a warm spot and allowed to rise for an hour.
It nearly doubled in size, making clear, that a half recipe, or even a quarter recipe would be plenty for both of us should I make this one again.
To the waffle iron! I used a 3/4 cup measuring cup to ladle the batter into the hot, oiled iron. Close the lid, the light goes on. A few minutes later, the light goes off, open the lid and remove the hot waffles.
When I had enough made to eat, Susie and I ate. The rest of the batter could wait a few minutes. I added homemade raspberry jam, whipped cream, caramel sauce and chopped pecans to mine. Breakfast is the most important meal of the day!
After we ate, Susie used the rest of the batter and cranked out waffles for the freezer. They are not Eggos. They are better. I just don't know if they'll re-heat like Eggos.
 Bon appétit!
Tuesday, August 17, 2010
Grilled Pizza
Not really that novel, a grilled pizza is still something I have never tried. Until today. I wanted something I could put together pretty quickly after work and have dinner ready when Susie got home.
I turned on the far right burner on the gas grill and let that get hot. I started with a Boboli crust. Yep. Boboli. Doesn't get any easier than that. I sprayed olive oil on each side and placed it on the portion of the grill away from the burner. I let it cook, or rather, heat for a couple minutes on each side.
Time for toppings. I spread a layer of fresh homemade pesto over the entire surface of the crust. Then a not-too-heavy sprinkling of grated mozzarella cheese. In succession then came diced red onion, diced prosciutto, reconstituted home-dried tomatoes (red, yellow and orange), and halved kalamata olives. Another thin layer of mozzarella on top would keep everything in place.
Off the pizza peel and back onto the grill with my creation. Again, on the portion of the grill away from the burner. It took 18 minutes (I was counting!) before the pizza was ready to slice and serve.
Absolutely delicious!
 Bon appétit!
Toasted Pecan Cheesecake
The guinea pigs at Benton County Mental Health will be enjoying a Toasted Pecan Cheesecake at their mid-month staff meeting this month. I must admit that after being out of cheesecake production for over a month because of vacation, it is good to be back. A co-worker of mine, who is retiring soon, selected this one for the upcoming payday. Now, to the practice version.
The crust is made from finely chopped toasted pecans, flour and melted butter. Susie roasted the pecans for me while I was at work. She spread the whole nuts on a baking sheet and toasted them at 350° for 5-10 minutes, keeping a close eye on them to keep them from burning.
When I got home, then pecans had cooled and I processed them and mixed the crust. I then pressed it into my parchment-lined cheesecake pan and popped it into the freezer.
The cheesecake batter itself is pretty simple. Cream cheese, plain yogurt and sugar are mixed for 3 minutes on medium high. Then eggs are added, one at a time, until incorporated. Vanilla and chopped pecans are folded in to complete the batter.
The mixture is poured over the frozen crust and baked in a 350° oven for 45-55 minutes, until gently browned on top. There should be a slight jiggle in the center on top when the pan is slightly shaken.
I garnished with whole toasted pecans.
 Bon appétit!
Monday, June 28, 2010
New York Style Cheesecake
Payday is almost here and that means Payday Cheesecake. This month I made a New York Style Cheesecake. I don't know if it is truly authentic New York style. That's just what the recipe title is.
The recipe is similar to other cheesecakes. Cream cheese and sugar are beaten together. Flour and lemon zest are then added. Eggs plus a couple egg yolks are then incorporated, one at a time. Finally, vanilla and heavy cream are added.
The batter is poured over a standard graham cracker crumb crust.
The oven is preheated to 500° and the cake bakes for 10 minutes. The temperature is reduced to 200° and the cake continues to bake for another 60 minutes.
When removed from the oven, the cheesecake will resemble a soufflé, puffed up over the top of the pan. The top will be a deep golden brown. It is allowed to cool for a couple hours, during which time it will settle back down into the pan. Cover with plastic wrap and refrigerate until cooled completely.
I am serving this cheesecake au naturel, without any topping or other embellishment. Sometimes simple is best. And easiest.
 Bon appétit!
Sunday, June 27, 2010
Baked Polenta Slices
The impetus for this dish was one we have all confronted over the years: "Best if used by" dates. The tube of polenta in the cupboard was a couple weeks past the best if used by date. Well, the debate in my mind began. Is "best if used by" the same as an expiration date? It certainly wasn't the same as a "don't use after" date. It would be fine, I decided. But what to make?
I wanted something simple. Very simple. I decided to just slice the polenta and bake the slabs. That's it. In a nutshell. I sprayed a cookie sheet with olive oil. (The spray bottle is an ingenious little invention that uses air, hand-pumped into the bottle, to create the pressure to create the spray). I cut the roll of polenta into slices, approximately a third of an inch thick and placed them on the oiled cookie sheet. A quick spray of oil on the top, a little black pepper, and a sprig of rosemary, before going into a 450° oven for 10-15 minutes.
For the sauce, I drained a can of diced tomatoes and added some roughly chopped oregano, thyme and rosemary from my herb garden. (There was more rosemary than I needed, as it turned out). I added a spoonful of chopped garlic and about a pound of bay scallops that had been sitting in the freezer, minding their own business. Finally, I added about a half-cup of the generic pasta sauce we had sitting in the fridge. Just enough to bind the ingredients together. I let this cook on medium until it was heated through and bubbling a bit.
As a side, I steamed some pea pods I had picked earlier in the day. I added nothing to them. No salt, no pepper, no butter. Nothing. They were delicious!
 Bon appétit!
Sunday, June 20, 2010
Chimichurri Pork Chops with Quick Rice & Tomatoes
Sauteed pork with chimichurri sauce is a Latin favorite. Or so I've read. The sauce is fresh and zesty. And garlicky. 3 large cloves of peeled garlic are fed into a running food processor. Then with the processor stopped, 3/4 cup of flat-leaf parsley leaves are added. This is pulsed to mix with the garlic. Make sure not to let it run until the mixture is pulverized. You want it to be a little chunky. Then, a pinch of red pepper flakes, 1 1/2 tablespoons olive oil, 2 teaspoons balsamic vinegar and 1/4 cup water are added. This is processed, forming a thick sauce. Set this aside.
Heat a nonstick pan on high heat. Add 3/4 ponds of boneless pork chops and brown on one side for two minutes. Turn and brown the verso for two minutes. Season with salt and pepper to taste. Or not. It's up to you. Reduce the heat to medium, cover the pan with a lid and continue to cook for approximately five minutes. Use a meat thermometer to test for doneness. It should read 160° when ready. Remove from the heat.
For the quick rice with tomatoes, boil a pot of water. Add a cup of rice and continue boiling, uncovered for about 10 minutes. The rice is ready when it has cooked through, but is not soft. Drain through a colander and return the rice to the pot. Add a can of diced tomatoes and mix well.
To serve, well, see the picture. I won't insult you Dear Reader, with the obvious.
 Bon appétit!
Thursday, May 27, 2010
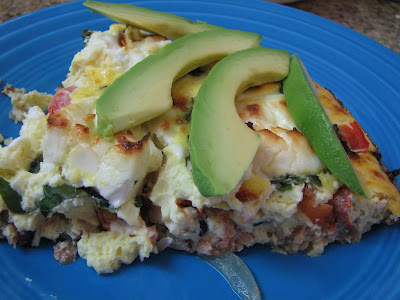
Smoked Salmon Faux Frittata
I don't know what else to call it. A frittata is started on the stove, then transferred to the oven. I must confess that I do not have an oven-safe skillet. Thus, the "faux."
Preheat the oven to 300° and oil a baking dish. In a frying pan, cook thinly sliced onions until they are translucent. Add flaked smoked salmon and sliced black olives. Pepper to taste. Warm through and set aside.
Whisk six eggs together with a splash of milk and a couple spoons of sour cream.
Add the salmon, olives and onions to the baking dish. Spread some diced tomatoes and chopped fresh basil over the top. Cut a package of cream cheese into cubes and evenly space them in the pan. Now gently pour the egg mixture over the top.
I baked this for 30 minutes and then turned the broiler on for an additional 5 minutes. Garnish with some slices of avocado and enjoy. This came out better than I could have hoped. Simply delicious!
 Bon appétit!
Wednesday, May 26, 2010
South of France Lemon Cheesecake
When The Boss Carlo left the library, she selected this cheesecake for her farewell party. Now the music cataloger is leaving, and she selected this one as well. And it will be payday. So, two birds, one stone.
This is the easiest cheesecake to make. I assert the superlative confidently. You shall see Dear Reader. You shall see. And then you will believe.
First of all, there is no crust. Simply line a 9-inch cheesecake pan with parchment paper as I have preached all along.
In a large bowl, stir a couple pounds of ricotta cheese with a rubber spatula until smooth. Add sugar and flour and mix until incorporated. Then six eggs are added, one at a time, mixing after each addition. Finally (yes, finally) lemon zest, lemon juice, vanilla and a little cinnamon are added.
Pour the batter into the pan and pop it into a 300° oven for 75-90 minutes. This cheesecake will be done when a knife can be inserted in the center and come out clean. (Other cheesecakes are done when lightly browned and or jiggly in the center).
This is a refreshing diversion (if one were to be needed) from the usual cheesecake. The texture differs from the "normal" cheesecake. As you can see from the picture, a large crack developed on the top of the cake as it cooled. Fortunately, it won't affect the taste.
 Bon appétit!
Saturday, May 22, 2010
Smoked Salmon Ravioli
 Homemade pasta filled with homemade smoked salmon? Sure. Why not? I have an old ravioli maker from my grandmother. Still in the original box no less. And I have a hand-crank pasta maker as well. I was set.
 I mixed the pasta dough with my hands. There really is no other way. I didn't have semolina flour so I used regular all-purpose flour. Two cups flour, two eggs, two tablespoons each of olive oil and water. The dough is a little rough to knead together. After it is well-mixed, let it rest for 15 minutes.
I set up the pasta maker on the counter and divided the dough into quarters. Working with a quarter at a time, I cranked it through the pasta maker, progressing from setting one through four, running the developing sheet through each setting a couple of times.
I lightly floured the ravioli maker and lay the pasta sheet across the top. Taking about a tablespoon of shredded smoked salmon, I pressed it into each indentation of the ravioli maker.
 Then make another pasta sheet to go on top. Prior to laying it on though, brush a little water on the pasta in the tray. This will help in sealing the ravioli. Lay the sheet on top and gently work out any air bubbles that may be present. Then, using the small rolling pin from the ravioli maker, seal and crimp the ravioli. Gently remove the ravioli from the mold and onto a cookie sheet. I have found that popping these into the freezer makes separating the ravioli a whole lot easier.
I made a second set of twelve raviolis, and froze them all. I returned to the freezer later to gently shake the raviolis to help keep them from freezing together.
The raviolis are cooked in gently boiling water. They only need a couple minutes to cook the pasta and heat the salmon filling. I served these with sun-dried tomato tapenade, slices of steamed zucchini, sliced avocado and shaved Parmesan cheese. Garlic bread on the side. Of course.
Bon appétit!
Monday, May 17, 2010
Black Forest Cheesecake
Cheesecakes do not get much easier than this one. For the Benton County Mental Health mid-month staff meeting, I prepared a Black Forest cheesecake.
I used chocolate double-stuffed Oreos for the crust. The cookie filling serves as the binding agent so the butter can be eliminated. This is not a health choice, but a choice that makes things simpler.
Cream cheese and sugar are beat on high for three minutes. Then two eggs are added, one at a time, and incorporated. The sides are scraped down and six ounces of semi-sweet chocolate, melted and cooled, and vanilla are added.
The mixture is poured onto the crust and the cake is baked at 350° for 45 minutes.
After allowing to cool for a couple hours, the cake is refrigerated overnight. For a topping, I used a can of cherry pie filling.
 Bon appétit!
Sunday, May 16, 2010
Asparagus Pesto
I found another recipe in the New York Times that looked both interesting, and more importantly, easy. Asparagus pesto! I didn't follow the recipe exactly, but it proved a good starting point.
I broke off the tough ends from about three pounds of asparagus. I cut the spears in half and boiled them for about ten minutes. Just until tender, but not mushy.
After draining the asparagus I put them in the food processor and added a couple handfuls of filberts, some garlic, grated Parmesan cheese and a little salt. I turned on the processor and slowly drizzled some olive oil in until the mixture was the consistency I was after. To be honest, I didn't know the consistency I was after. It was about a quarter cup of oil though.
To serve, I offered the pesto in a bowl with slices of baguette. It was scrumptious.
 Bon appétit!
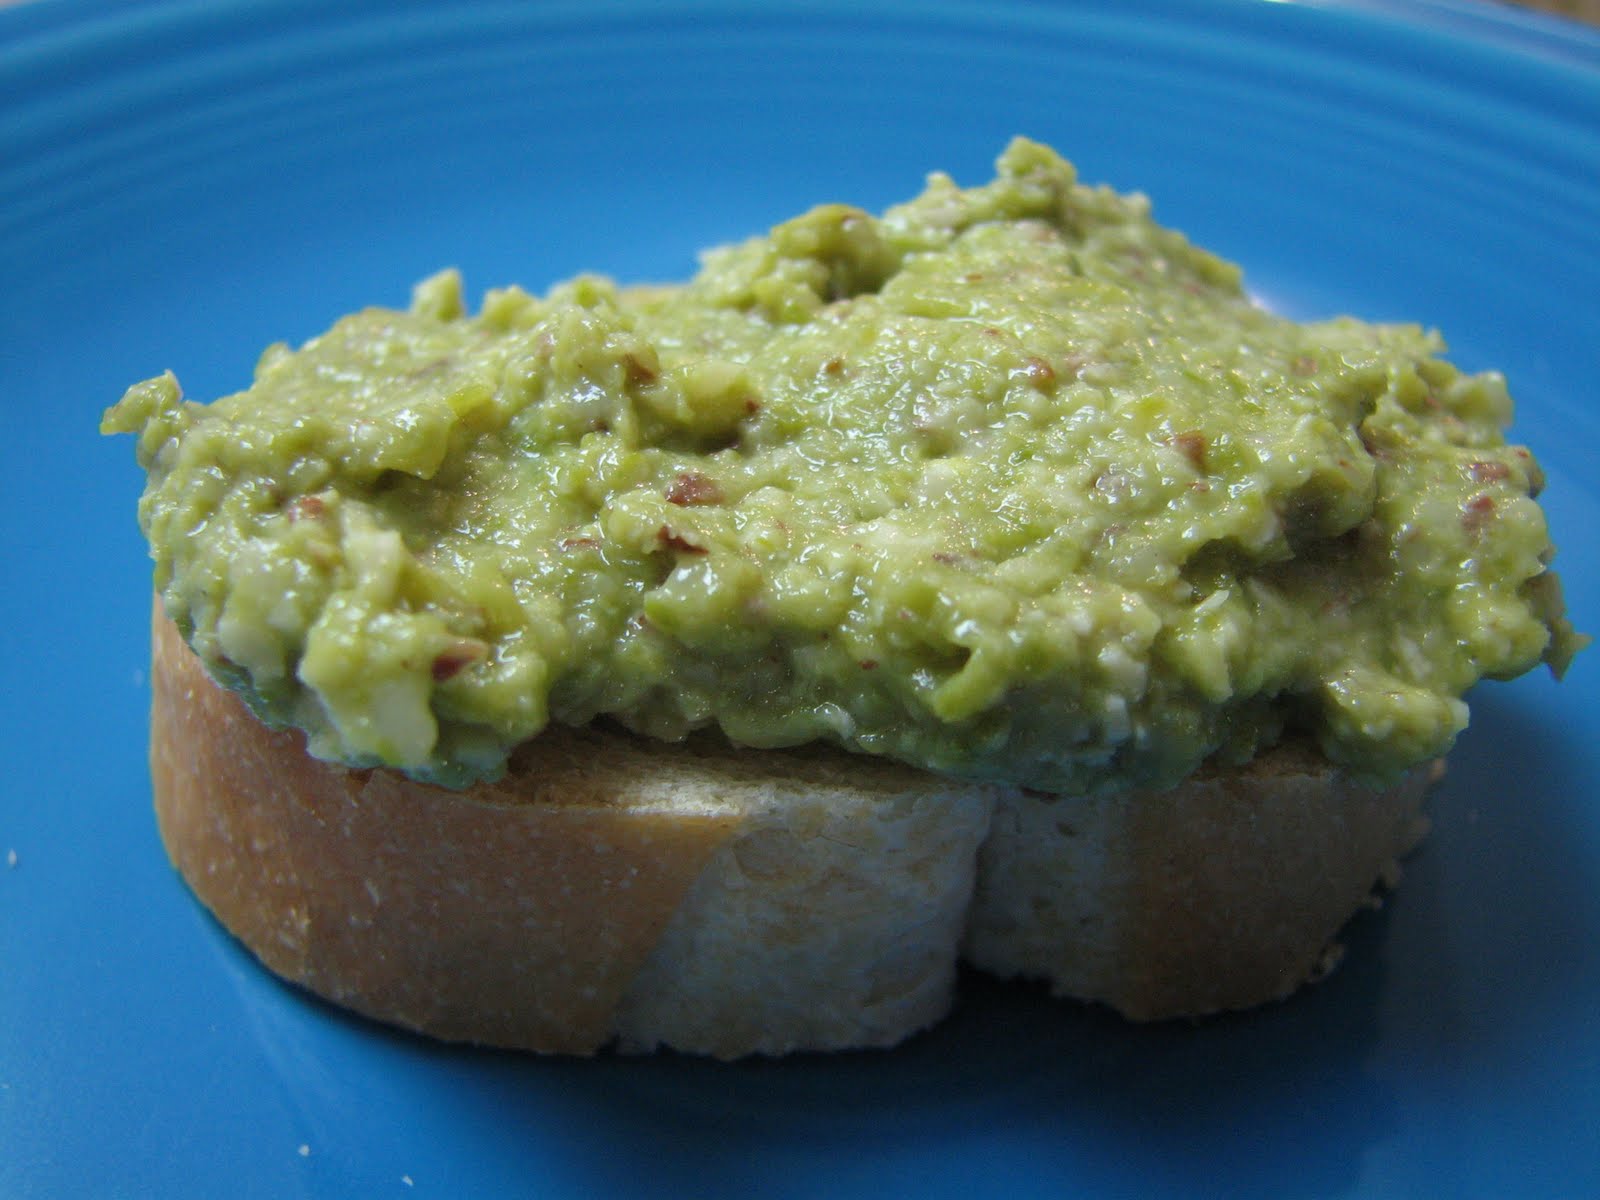
Sun-Dried Tomato Tapenade
Since I already had the food processor out, I thought I'd try something else. Something new. Something from my imagination. I still had a bunch of sun-dried tomatoes from last year's harvest and decided I'd invent a tapenade.
First, I brought a pot of water to a boil and added a bunch (there was no measuring involved) of dried tomatoes. I boiled them for 5-10 minutes. Enough to soften them, but not so much as to turn them mushy.
I drained them and added them to the food processor. Then I added a few handfuls of filberts, fresh basil, garlic, Parmesan cheese and some balsamic vinegar. As the ingredients were processed, I slowly drizzled in some olive oil. I wanted a coarse yet spreadable mixture. I got it.
I served my creation with slices of baguette, and it was absolutely delicious. I couldn't have been happier with it!
 Bon appétit!
Grilled Salmon
For our Sunday entree, I planned to grill the remaining fillet from the salmon that Brian had delivered a few days earlier. I was going to a baseball game prior to dinner so this had to be kept simple. In hindsight, I could not have made it simpler.
I chopped up some thyme, Italian parsley and dill. In a bowl I mixed some olive oil and naranja agria, then added the herbs. I used a spoon to kind of mush the herbs a bit in order to get the juices flowing. I popped this into the fridge until I returned from the game
Naranja agria is bitter orange juice and is available at Latin grocery stores. It is fantastic for marinades!
When I returned home, I fired up the grill and laid the salmon on the rack. Then I spooned the marinade onto the fish. C'est tout! After 10-15 minutes it was time to eat.
Sometimes I think I need to perform a lot of fancy culinary tricks to achieve deliciousness. This was a time when I was reminded that sometimes the simplest things are the tastiest.
 Bon appétit!
Friday, May 14, 2010
Smoked Salmon
 Ah. Smoked salmon. Who does not love smoked salmon? Even the devoutest of vegetarians might make an exception for good smoked salmon.
It has been a while since I last did this, but here goes. First, get a salmon. I have a great way for doing this. One of my Special Olympics athletes, Brian, is quite the fisherman. Two days ago he showed up at my door with a salmon in a plastic bag. A fifteen-pound salmon, give or take. (I did buy him an OREGON t-shirt that I'll give him at the baseball game tonight).
There would be a few firsts in this process. It was the first time I filleted a salmon with a real fillet knife. And it was the first time I filleted a salmon in our house, with its ample counter space. A few years ago, I struggled with a regular kitchen knife on the tiny bit of counter in my old apartment. Filleting a salmon is an art, one which I make no claims to having mastered. But I did find that given the proper knife, and enough space, the process went smoothly. Too smoothly?
 I then cut the fillet into pieces, or slabs, about 1-2 inches thick. As I do this, a simple twist of the knife removes the skin from the fish. I like to leave the tail portion about six inches. No reason. I just like to.
The pieces of salmon are dredged thoroughly in a mixture of equal parts iodized sea salt and brown sugar. Really pack it around the fish. The pieces are placed on a waxed paper lined cookie sheet and refrigerated for a day or two. The salt and sugar draw out excess moisture from the meat in preparation for smoking.
 Now, rinse the salt and sugar from the pieces of salmon. You cannot scrub too hard here. The sugar will have infused the fish. You just don't want it to be too salty. Place the salmon onto clean waxed paper and blot excess water with a paper towel. At this point I like to brush the fish with some maple syrup, and pop it back into the fridge overnight.
Now we are ready to smoke the salmon. Get the smoker ready to go and retrieve the salmon from the refrigerator. Place the pieces of fish on the smoking screens, allowing space between them. I give them another brushing of maple syrup before I pop them in the smoker.
I just use the store-bought smoker chips. Fill the chip pan, place the racks in the smoker, and...plug it in. After an hour I put new chips in the smoker pan. After two hours, the smoked salmon is done. Sometimes a little more, or a little less time. It depends on the consistency you're looking for. I like a caramelized outside with a tender inside.
Now the only thing left to do, is to eat it.
 Bon appétit!
Monday, May 3, 2010
Savory Crêpes with Chicken, Asparagus & Sun-Dried Tomatoes
This is more of an assembly of recipes covered in earlier posts than a new recipe. My plan was to come up with something that wouldn't take too much time to prepare on a week night. For this dinner I'll use crêpes, but will omit the sugar from the recipe; roasted asparagus with reconstituted sun-dried tomatoes; fried chicken breast, cut into cubes; and store-bought chicken gravy from a jar.
First, Susie cooked the chicken. Then I made the crêpes. I spread a little kalamata olive paste on each prepared crêpe. Into each I laid a few asparagus spears, a bit of diced chicken, and some of the tomatoes. I nuked the gravy and drizzled a little over the assembled crêpes. Finally, I garnished with some chive flowers. Because I can. And that is it. Really.


Bon appétit!
Sunday, May 2, 2010
Crêpes with Strawberries & Whipped Cream
I am going to watch a couple hours of baseball on television this morning, and then go to a baseball game this afternoon. Something needed to be done to keep things running smoothly at home. The answer: Sunday morning strawberry crêpes. With whipped cream!
The batter is as simple as it gets: 2 eggs, 1 cup milk, 1/2 cup flour and 2 tablespoons sugar. Whisk the eggs and then add each ingredient in succession, fully incorporating each one as you go. A blender would work fine as well. I went with the whisk just to keep clean up to a minimum. Refrigerate the batter for an hour. Or not. Chilled batter is easier to work with during the cooking portion of the recipe.
I melted a little butter and had it at hand as I prepared to cook the crêpes. I brushed a little butter in a nine-inch frying pan. Then I used a 1/4 cup measuring cup as a ladle and poured a nearly-full scoop of the batter into the center of the pan. I rolled the pan to spread the batter evenly across the bottom. After a minute or so, I used a spatula to loosen the edge of the crêpe and, using my fingers, gently lifted it from the pan, turned it, and returned it to the pan and the heat to cook the other side. Another minute or so. Remove the crêpe from the heat to a plate and repeat until the batter has been exhausted. This recipe made 9 crêpes. Four for each of us, and one to wolf down when Susie wasn't looking.
 For the filling, we had some strawberries from last season. In the freezer. Susie took them out to thaw last night. This morning she added a little sugar to them.
I placed some of the sweetened strawberries in the center of a crêpe and folded it into quarters. Four of these filled a medium plate nicely.
I am all about convenience. Some times. For the whipped topping, I used canned whipped cream. It would just be easier than whipping and sweetening cream. Clean up would be easier as well. For Susie. (Unwritten agreement: one cooks, the other cleans. Most of the time.)
 Bon appétit!
Tuesday, April 27, 2010
Mandarin Orange Cheesecake II
"Again?" You may ask. Yes. Again. The previous Mandarin Orange Cheesecake was for Benton County Mental Health. They were test subjects. Very willing test subjects.
For my payday cheesecake, I modified a few of the steps. Two.
First, instead of folding the mandarin slices into the cheesecake batter, I poured half the batter in the pan. (Remember to line the sides with parchment strips!) Then I set the orange slices on top, spacing them over the surface. Then I added the rest of the batter.
Instead of blanched slivered almonds, I used sliced almonds. I just wanted a better contrast on the surface.
Now, the trouble. When I poured the topping onto the center of the cheesecake prior to spreading it evenly across the top, it slumped into the cake. In my attempt to spread the topping, the aesthetic quality I was hoping for was lost. The taste would not be affected though, unless you were the person who got a slice with an intrusion of extra topping. Oh bother. You can't win them all. I doubt there will be complaints.
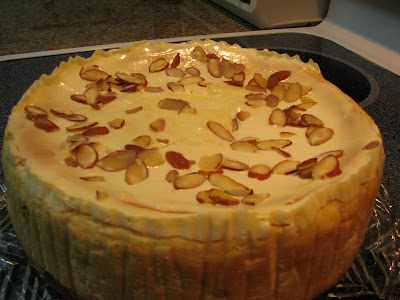 Bon appétit!
For my payday cheesecake, I modified a few of the steps. Two.
First, instead of folding the mandarin slices into the cheesecake batter, I poured half the batter in the pan. (Remember to line the sides with parchment strips!) Then I set the orange slices on top, spacing them over the surface. Then I added the rest of the batter.
Instead of blanched slivered almonds, I used sliced almonds. I just wanted a better contrast on the surface.
Now, the trouble. When I poured the topping onto the center of the cheesecake prior to spreading it evenly across the top, it slumped into the cake. In my attempt to spread the topping, the aesthetic quality I was hoping for was lost. The taste would not be affected though, unless you were the person who got a slice with an intrusion of extra topping. Oh bother. You can't win them all. I doubt there will be complaints.
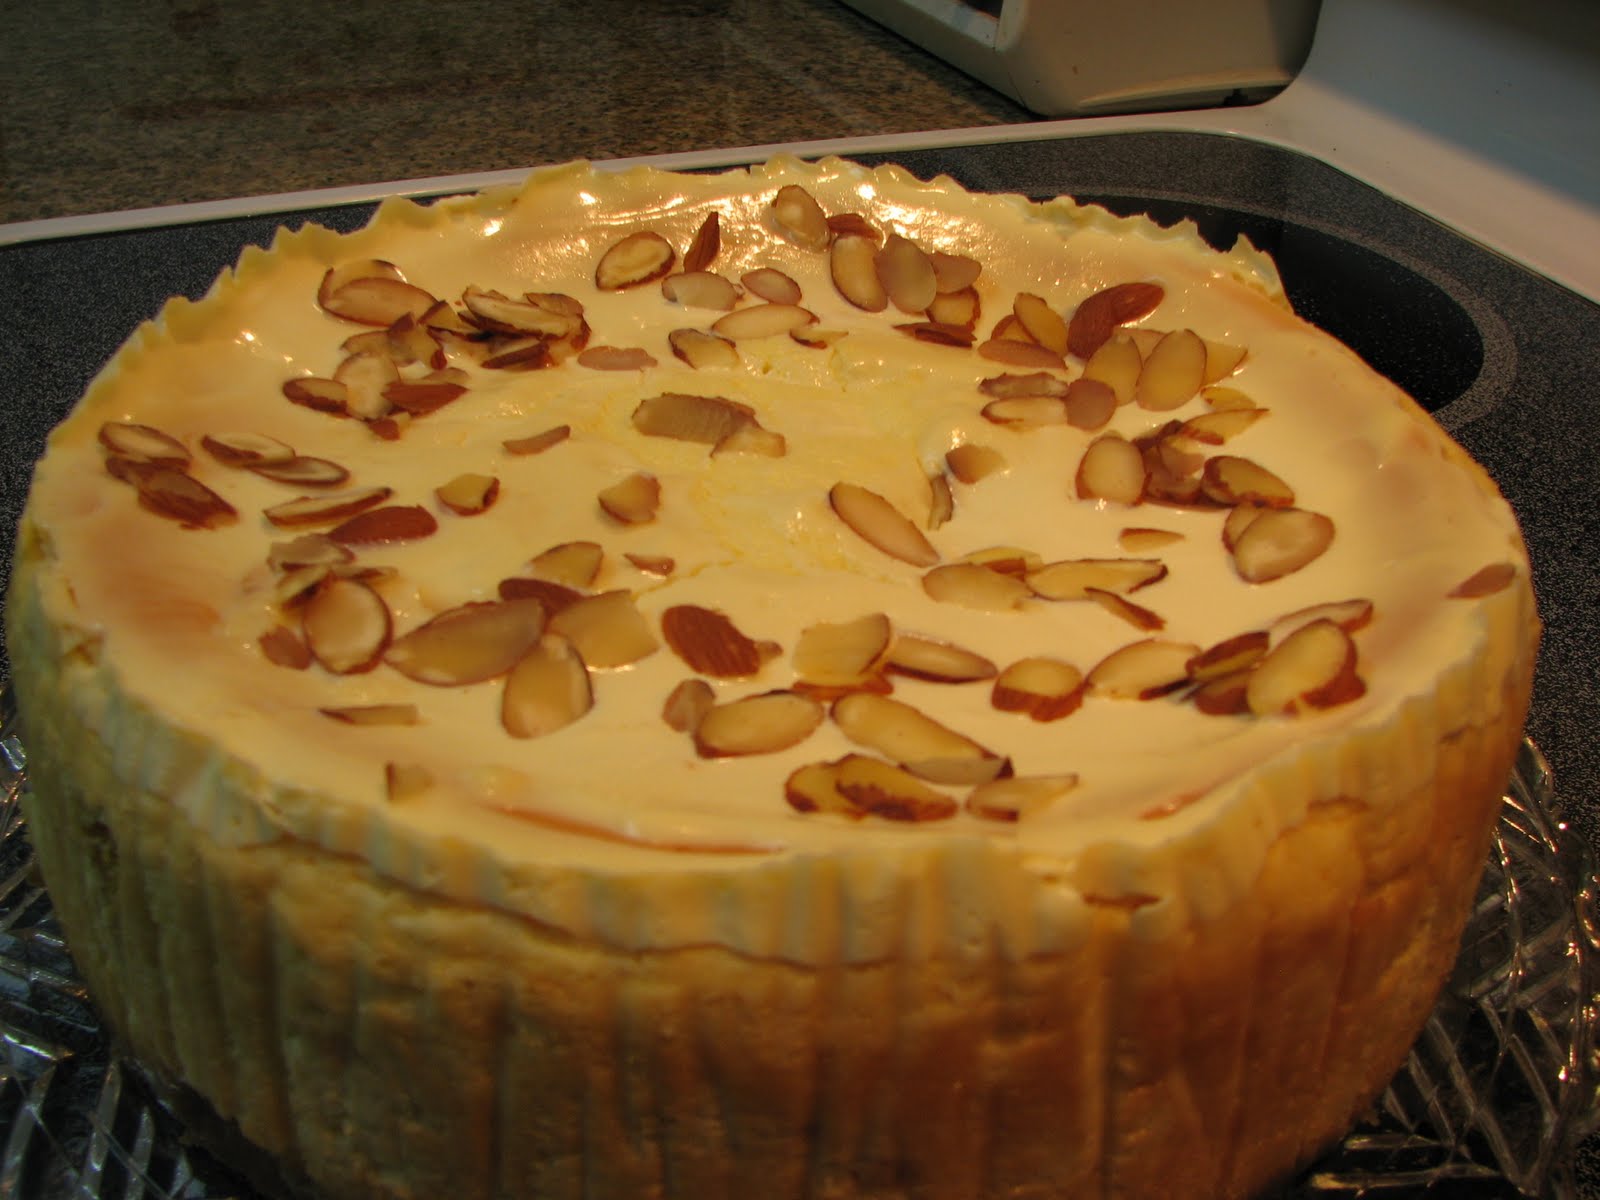 Bon appétit!
Tuesday, April 13, 2010
Mandarin Orange Cheesecake
This month's cheesecake for the good folks at Benton County Mental Health is a Mandarin Orange Cheesecake. I made one a few years ago and decided it was time to make another. To improve on the original.
Remember to line the pan with strips of parchment paper to facilitate removal of the finished cake.
Starting with the crust, I used vanilla wafer crumbs instead of graham crackers. Why not? Just to be different. A deviant. Melted butter is worked into the crumbs and then this is pressed into the bottom of a 9-inch cheesecake pan. Pop it into the freezer while the batter is made.
The batter consists of cream cheese, butter, and sugar, beaten at medium-high speed for a few minutes. Have I said lately how much I love my stand-up mixer? I really do! Eggs are added, one at a time. Then sour cream, vanilla and concentrated orange juice. After this has all been mixed well, a can of drained mandarin orange sections is folded in. The batter is poured over the frozen crust.
The cake bakes at 350° for 45-55 minutes. Just until it is starting to brown ever so slightly, and there is a little jiggle left in the center when the pan is gently shaken. Remove from the oven and leave the oven on. Allow the cake to cool for 10-15 minutes.
Now, while the cake cools, mix sour cream, orange juice and sugar. Pour this onto the center of the cake and spread evenly to the sides. I added some blanched slivered almonds. It goes back into the over for 5 minutes. Remove the finished cake from the oven and allow to cool thoroughly on a rack.
Of course, the topping as well as the almonds are optional. But one of the beautiful things about this and other toppings, aside from their flavor, is that they do a bang-up job of concealing any flaws, such as cracks, that may appear on the surface of the cheesecake.
 Bon appétit!
Monday, April 12, 2010
Stir-Fried Iceberg Lettuce with Shrimp
Iceberg lettuce is the bastard child of the lettuce family. Prior to making this recipe I cannot remember the last time I bought a head of it. It is just so much nothing. Well, water.
I came across this dish in the New York Times and thought it looked interesting, and easy enough to give it a try.
Shredded iceberg lettuce and scallions are stir-fried over medium-high heat until the lettuce has cooked down. I still had some leeks from the garden so I used them instead of scallions. The greens are set aside on a plate.
Turn the temperature down to medium. Garlic and ginger are then sautéed a bit and the shrimp are added. This is cooked until the shrimp are no longer translucent and are bright pink. This takes two or three minutes.
The lettuce and leeks are then added back into the wok. I deviated from the recipe and also added some softened rice noodles. Finally, a mixture of corn starch, sugar, rice wine, soy sauce and sesame oil is added. This is cooked until the sauce thickens.
The verdict is that the dish is good. Not great. Just good. It was somewhat bland. I plan to try this again, but will add something to add a little more flavor.
 Bon appétit!
Sunday, April 4, 2010
Tzatziki
No Greek meal is complete without tzatziki (τζατζίκι, pronounced dza-DZEE-ke), the yogurt garlic dip that goes splendidly with pita bread wedges.
I usually strain plain lowfat yogurt overnight to remove the whey, leaving the yogurt thick and creamy. This time I used Greek yogurt. It is already thick and doesn't need to be strained.
Olive oil and lemon juice are whisked together and the yogurt is folded in until well incorporated. Garlic and some grated cucumber are added and... that's it. Set aside to allow the garlic to permeate the yogurt.
Serve with triangles of pita bread.
 Bon appétit!
Bandit's Lamb
The entree for our Greek Easter dinner is Bandit's Lamb (αρνάκι κλέφτικο, pronounced ahr-NAH-kee KLEF-tee-koh). It is an adaptation of a dish prepared by guerillas, bandits, partisans, etc..., who needed to prepare meals without giving away there location. They would place meat on coals in a hole in the ground and let it cook. I am not digging a hole in the yard for Easter.
I picked up a 4-pound leg of lamb at Eugene institution Long's Meat Market. They deboned the leg for me and let me keep the bone for the dog. They even tied it up neatly for me.
On sheet of parchment paper laid out on the counter, I placed the lamb. Then I cut slits in the meat and inserted cloves of garlic and chunks of kefalotyri cheese. Kefalotyri is a hard Greek cheese made from sheep's milk.
Carrots and potatoes, cut into bite-size, or slightly larger chunks are placed around the lamb. A drizzle of olive oil is added and the parchment is folded up and over the meat and vegetables, then tucked under to form a packet.
Place the package in a roasting pan and fill the pan about a third of the way with water. Bake in a 480° oven for about 2 and a half hours. During baking, periodically add more water to the pan to prevent drying out.
After allowing to rest for a bit after removing from the oven, transfer the package to a serving platter, tear open the parchment and serve. Or, remove the meat and vegetables from the package and place on a serving platter.
 Bon appétit!
Horiatiki Salata (Greek Salad)
An essential of any Greek meal, Horiatiki Salata (χωριάτικη σαλάτα, pronounced haw-ree-AH-tee-kee sah-LAH-tah) is a salad of tomato, cucumber and red onion, along with feta cheese and kalamata olives.
The dressing is made by whisking red wine vinegar, lemon juice, olive oil and dried oregano. It is set aside and the salad is assembled.
Dice the cucumber and tomatoes into 1/2" pieces. Slice the red onion in very thin strips. Coarsely chop some flat-leaf parsley. Toss this gently in a bowl. Add the dressing and fold the salad to coat evenly.
Just prior to serving add crumbled feta cheese and kalamata olives.
Fairly simple and very delicious. Every time.
 Bon appétit!
Sunday, March 28, 2010
Greek Easter Bread
With Greek Easter one week away, not much free time between now and then, and the simple desire to bake something today, I am making Greek Easter Bread (τσουρέκι πασχαλινό, pronounced tsoo-REH-kee pahs-khah-lee-NO). It is a sweet bread often served with a traditional red egg tucked into the the top of the twist. I made the eggs last year and am skipping them this year. I just don't want to deal with 15 pounds of yellow onions. More precisely, the skins from 15 pounds of yellow onions. Let's just worry about the bread.
Luke warm milk and yeast are mixed in a small bowl. A few spoonfuls of flour are incorporated until a paste is formed. This is set aside to rise. The recipe doesn't say for how long. I just checked on it periodically. After half an hour or so, it had tripled in size. At least.
In the bowl for my stand-up mixer I added flour, salt and melted butter. Mahlab is boiled in water and then the strained liquid is added to the mixing bowl. Eggs, the yeast mixture and a few pieces of mastic that have been crushed together with a bit of sugar are added. As the dough hook worked its labor-saving magic, I added spoonfuls of flour until a good "maleable" dough came together. This is covered and allowed to rise for a couple hours.
After rising, the dough is punched down and shapes are created. I am going with simple braids. Ropes of just over a foot are formed. On a greased cookie sheet, three of these are then braided and the ends are tucked under. Cover and allow to rise in a warm place until doubled in size.
Brush with egg wash, sprinkle with sugar or sliced almonds and bake at 350° for 30 minutes, or until golden brown. When tapped on the bottom, they should sound hollow. Cool on racks.
For the record, I made a half-recipe. The full recipe makes 6 two-pound loaves. I made 2 three-pound loaves and sprinkled one with Premium Maui Gold natural cane sugar.
 Bon appétit!
Saturday, March 27, 2010
Peanut Butter Cheesecake III
Yes. Peanut Butter Cheesecake III. This month's payday cheesecake will be the same as last month's, except with milk chocolate ganache instead of raspberry jam. I made this for Susie's mid-month payday, but was troubled that there were tiny air bubbles in the ganache. Inquiries were made and I determined (read: guessed) that I whisked the hot cream and chocolate too vigorously, incorporating air into the ganache. A gentler, though not necessarily kinder approach would be used for this reprise.
I brought the cream and the butter just to a boil and poured it over the Ghiradelli milk chocolate chips. I let it sit for a few minutes and then went in with the whisk. It was a test of my patience to whisk gently. It just seemed oxymoronic. Wrong even. But I persisted.
I was sure there were still some chunks of unincorporated chocolate in the ganache, so I poured it through a strainer into a small bowl. There was some undissolved chocolate as I had suspected. It was quite tasty.
The ganache then cools to room temperature before being refrigerated to thicken for use. I want a viscous liquid that will spread slowly, without running. Pour the ganache over the top of the cheesecake and pop back into the fridge to set.
 Bon appétit!
Baklava
I decided to make the baklava a full week in advance of my big Greek Easter meal. For two reasons. One, there just isn't a lot of free time in the evenings before Greek Easter, after this weekend, to get everything ready. And two, Thursday is the Edible Book Festival at the UO Library, and I need a piece of baklava for one of my entries.
Baklava (μπακλαβάς and pronounced bahk-lah-VAHS) is perhaps the most well-known Greek food. Well, let's not forget about gyros. But still. It is a simple recipe that can be anything but to assemble. Layers of phyllo dough, painted with clarified butter, a layer chopped walnuts, all soaked in a sweet rose-flavored syrup. The really daunting part of making baklava is working with the phyllo.
Sugar and water are boiled for a couple minutes and then two tablespoons of rose water are added just before removing from the heat. This is allowed to cool and then refrigerated until needed.
Process a couple cups of walnuts and two tablespoons of rose water in a food processor until very fine. Set aside.
Two cups of unsalted butter are clarified. I don't know any short-cuts for this. I simply use a spoon and skim the solids that rise to the surface while the butter is heated. There are still some solids at the bottom of the pan, so I carefully pour the clarified butter off into a bowl. If solids get into the clarified butter, they will burn and blacken when the baklava is baked.
Phyllo dough is paper-thin and dries out quickly, so a damp (not wet, just slightly damp) towel is laid over the sheets of dough while assembling the baklava.
Now the tough part. Brush some of the butter into a baking pan. Then lay a single sheet of phyllo in the bottom of the pan, cover the remaining sheets with the towel and brush butter on the sheet in the pan. Repeat this again and again and again until half the phyllo has been used. Then evenly spread the walnut and rose water mixture over the top. Then, you guessed it, back to the phyllo layers. Place a sheet, cover the rest, butter. Repeat until all the sheets have been used.
With a knife, carefully cut through the assembled baklava, first lengthwise in one-inch strips, and then on a bias to form the traditional diamond shapes. Actually, mine come out looking more like parallelograms. No worries. This is not a geometry exercise. Pour the remaining clarified butter over the top and spread it evenly with the pastry brush.
The pan goes into a 350° oven for 30 minutes. The temperature is then raised to 425° for an additional 10 minutes.
Remove the pan from the oven and pour the chilled sugar and rose water syrup evenly over the top. It will sizzle. Enticingly.
 Bon appétit!
Tuesday, March 16, 2010
Peanut Butter Cheesecake II
After Susie and I were married I expanded the Payday Cheesecake program to include the good folks at Benton County Mental Health. They were grateful, and remained so even after they learned that just because they get paid twice a month, they were going to get one cheesecake and not two. This month they get dessert on the mid-month payday. I doubt they will feel slighted that they will be receiving the same recipe, for Peanut Butter Cheesecake, that I prepared for my co-workers a couple weeks ago.
The same recipe, with a twist. A variation really. Instead of raspberry jam to top the cheesecake, I went with a milk chocolate ganache. So, this post is really about making ganache.
I put 8 ounces of milk chocolate in a small mixing bowl. Then, over medium heat, I brought 3/4 cup heavy whipping cream and 2 tablespoons unsalted butter just to a boil. Immediately, the hot cream and butter was poured over the chocolate and whisked until smooth and shiny. Into the refrigerator to cool and thicken a bit.
After a couple hours, I poured some of the ganache on the top of the cheesecake, letting it spread close to the edge. There were tiny bubbles in the ganache and I neither knew how nor cared to try to smooth them out. I doubt anybody will notice, or care.
 Bon appétit!
Subscribe to:
Posts (Atom)
