Tuesday, August 17, 2010

Toasted Pecan Cheesecake

The guinea pigs at Benton County Mental Health will be enjoying a Toasted Pecan Cheesecake at their mid-month staff meeting this month. I must admit that after being out of cheesecake production for over a month because of vacation, it is good to be back. A co-worker of mine, who is retiring soon, selected this one for the upcoming payday. Now, to the practice version.

The crust is made from finely chopped toasted pecans, flour and melted butter. Susie roasted the pecans for me while I was at work. She spread the whole nuts on a baking sheet and toasted them at 350° for 5-10 minutes, keeping a close eye on them to keep them from burning.

When I got home, then pecans had cooled and I processed them and mixed the crust. I then pressed it into my parchment-lined cheesecake pan and popped it into the freezer.

The cheesecake batter itself is pretty simple. Cream cheese, plain yogurt and sugar are mixed for 3 minutes on medium high. Then eggs are added, one at a time, until incorporated. Vanilla and chopped pecans are folded in to complete the batter.

The mixture is poured over the frozen crust and baked in a 350° oven for 45-55 minutes, until gently browned on top. There should be a slight jiggle in the center on top when the pan is slightly shaken.

I garnished with whole toasted pecans.

Bon appétit!

Monday, June 28, 2010

New York Style Cheesecake

Payday is almost here and that means Payday Cheesecake. This month I made a New York Style Cheesecake. I don't know if it is truly authentic New York style. That's just what the recipe title is.

The recipe is similar to other cheesecakes. Cream cheese and sugar are beaten together. Flour and lemon zest are then added. Eggs plus a couple egg yolks are then incorporated, one at a time. Finally, vanilla and heavy cream are added.

The batter is poured over a standard graham cracker crumb crust.

The oven is preheated to 500° and the cake bakes for 10 minutes. The temperature is reduced to 200° and the cake continues to bake for another 60 minutes.

When removed from the oven, the cheesecake will resemble a soufflé, puffed up over the top of the pan. The top will be a deep golden brown. It is allowed to cool for a couple hours, during which time it will settle back down into the pan. Cover with plastic wrap and refrigerate until cooled completely.

I am serving this cheesecake au naturel, without any topping or other embellishment. Sometimes simple is best. And easiest.

Bon appétit!

Sunday, June 27, 2010

Baked Polenta Slices

The impetus for this dish was one we have all confronted over the years: "Best if used by" dates. The tube of polenta in the cupboard was a couple weeks past the best if used by date. Well, the debate in my mind began. Is "best if used by" the same as an expiration date? It certainly wasn't the same as a "don't use after" date. It would be fine, I decided. But what to make?

I wanted something simple. Very simple. I decided to just slice the polenta and bake the slabs. That's it. In a nutshell. I sprayed a cookie sheet with olive oil. (The spray bottle is an ingenious little invention that uses air, hand-pumped into the bottle, to create the pressure to create the spray). I cut the roll of polenta into slices, approximately a third of an inch thick and placed them on the oiled cookie sheet. A quick spray of oil on the top, a little black pepper, and a sprig of rosemary, before going into a 450° oven for 10-15 minutes.

For the sauce, I drained a can of diced tomatoes and added some roughly chopped oregano, thyme and rosemary from my herb garden. (There was more rosemary than I needed, as it turned out). I added a spoonful of chopped garlic and about a pound of bay scallops that had been sitting in the freezer, minding their own business. Finally, I added about a half-cup of the generic pasta sauce we had sitting in the fridge. Just enough to bind the ingredients together. I let this cook on medium until it was heated through and bubbling a bit.

As a side, I steamed some pea pods I had picked earlier in the day. I added nothing to them. No salt, no pepper, no butter. Nothing. They were delicious!

Bon appétit!

Sunday, June 20, 2010

Chimichurri Pork Chops with Quick Rice & Tomatoes

Sauteed pork with chimichurri sauce is a Latin favorite. Or so I've read. The sauce is fresh and zesty. And garlicky. 3 large cloves of peeled garlic are fed into a running food processor. Then with the processor stopped, 3/4 cup of flat-leaf parsley leaves are added. This is pulsed to mix with the garlic. Make sure not to let it run until the mixture is pulverized. You want it to be a little chunky. Then, a pinch of red pepper flakes, 1 1/2 tablespoons olive oil, 2 teaspoons balsamic vinegar and 1/4 cup water are added. This is processed, forming a thick sauce. Set this aside.

Heat a nonstick pan on high heat. Add 3/4 ponds of boneless pork chops and brown on one side for two minutes. Turn and brown the verso for two minutes. Season with salt and pepper to taste. Or not. It's up to you. Reduce the heat to medium, cover the pan with a lid and continue to cook for approximately five minutes. Use a meat thermometer to test for doneness. It should read 160° when ready. Remove from the heat.

For the quick rice with tomatoes, boil a pot of water. Add a cup of rice and continue boiling, uncovered for about 10 minutes. The rice is ready when it has cooked through, but is not soft. Drain through a colander and return the rice to the pot. Add a can of diced tomatoes and mix well.

To serve, well, see the picture. I won't insult you Dear Reader, with the obvious.

Bon appétit!

Thursday, May 27, 2010

Smoked Salmon Faux Frittata

I don't know what else to call it. A frittata is started on the stove, then transferred to the oven. I must confess that I do not have an oven-safe skillet. Thus, the "faux."

Preheat the oven to 300° and oil a baking dish. In a frying pan, cook thinly sliced onions until they are translucent. Add flaked smoked salmon and sliced black olives. Pepper to taste. Warm through and set aside.

Whisk six eggs together with a splash of milk and a couple spoons of sour cream.

Add the salmon, olives and onions to the baking dish. Spread some diced tomatoes and chopped fresh basil over the top. Cut a package of cream cheese into cubes and evenly space them in the pan. Now gently pour the egg mixture over the top.

I baked this for 30 minutes and then turned the broiler on for an additional 5 minutes. Garnish with some slices of avocado and enjoy. This came out better than I could have hoped. Simply delicious!

Bon appétit!

Wednesday, May 26, 2010

South of France Lemon Cheesecake

When The Boss Carlo left the library, she selected this cheesecake for her farewell party. Now the music cataloger is leaving, and she selected this one as well. And it will be payday. So, two birds, one stone.

This is the easiest cheesecake to make. I assert the superlative confidently. You shall see Dear Reader. You shall see. And then you will believe.

First of all, there is no crust. Simply line a 9-inch cheesecake pan with parchment paper as I have preached all along.

In a large bowl, stir a couple pounds of ricotta cheese with a rubber spatula until smooth. Add sugar and flour and mix until incorporated. Then six eggs are added, one at a time, mixing after each addition. Finally (yes, finally) lemon zest, lemon juice, vanilla and a little cinnamon are added.

Pour the batter into the pan and pop it into a 300° oven for 75-90 minutes. This cheesecake will be done when a knife can be inserted in the center and come out clean. (Other cheesecakes are done when lightly browned and or jiggly in the center).

This is a refreshing diversion (if one were to be needed) from the usual cheesecake. The texture differs from the "normal" cheesecake. As you can see from the picture, a large crack developed on the top of the cake as it cooled. Fortunately, it won't affect the taste.

Bon appétit!

Saturday, May 22, 2010

Smoked Salmon Ravioli

Homemade pasta filled with homemade smoked salmon? Sure. Why not? I have an old ravioli maker from my grandmother. Still in the original box no less. And I have a hand-crank pasta maker as well. I was set.
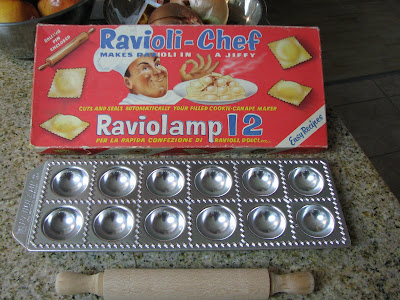
I mixed the pasta dough with my hands. There really is no other way. I didn't have semolina flour so I used regular all-purpose flour. Two cups flour, two eggs, two tablespoons each of olive oil and water. The dough is a little rough to knead together. After it is well-mixed, let it rest for 15 minutes.

I set up the pasta maker on the counter and divided the dough into quarters. Working with a quarter at a time, I cranked it through the pasta maker, progressing from setting one through four, running the developing sheet through each setting a couple of times.

I lightly floured the ravioli maker and lay the pasta sheet across the top. Taking about a tablespoon of shredded smoked salmon, I pressed it into each indentation of the ravioli maker.

Then make another pasta sheet to go on top. Prior to laying it on though, brush a little water on the pasta in the tray. This will help in sealing the ravioli. Lay the sheet on top and gently work out any air bubbles that may be present. Then, using the small rolling pin from the ravioli maker, seal and crimp the ravioli. Gently remove the ravioli from the mold and onto a cookie sheet. I have found that popping these into the freezer makes separating the ravioli a whole lot easier.

I made a second set of twelve raviolis, and froze them all. I returned to the freezer later to gently shake the raviolis to help keep them from freezing together.

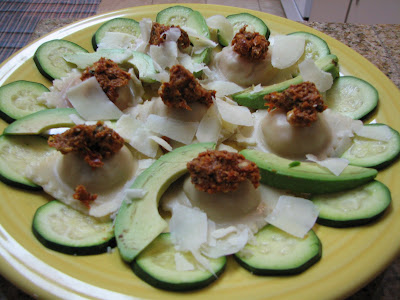
The raviolis are cooked in gently boiling water. They only need a couple minutes to cook the pasta and heat the salmon filling. I served these with sun-dried tomato tapenade, slices of steamed zucchini, sliced avocado and shaved Parmesan cheese. Garlic bread on the side. Of course.

Bon appétit!